
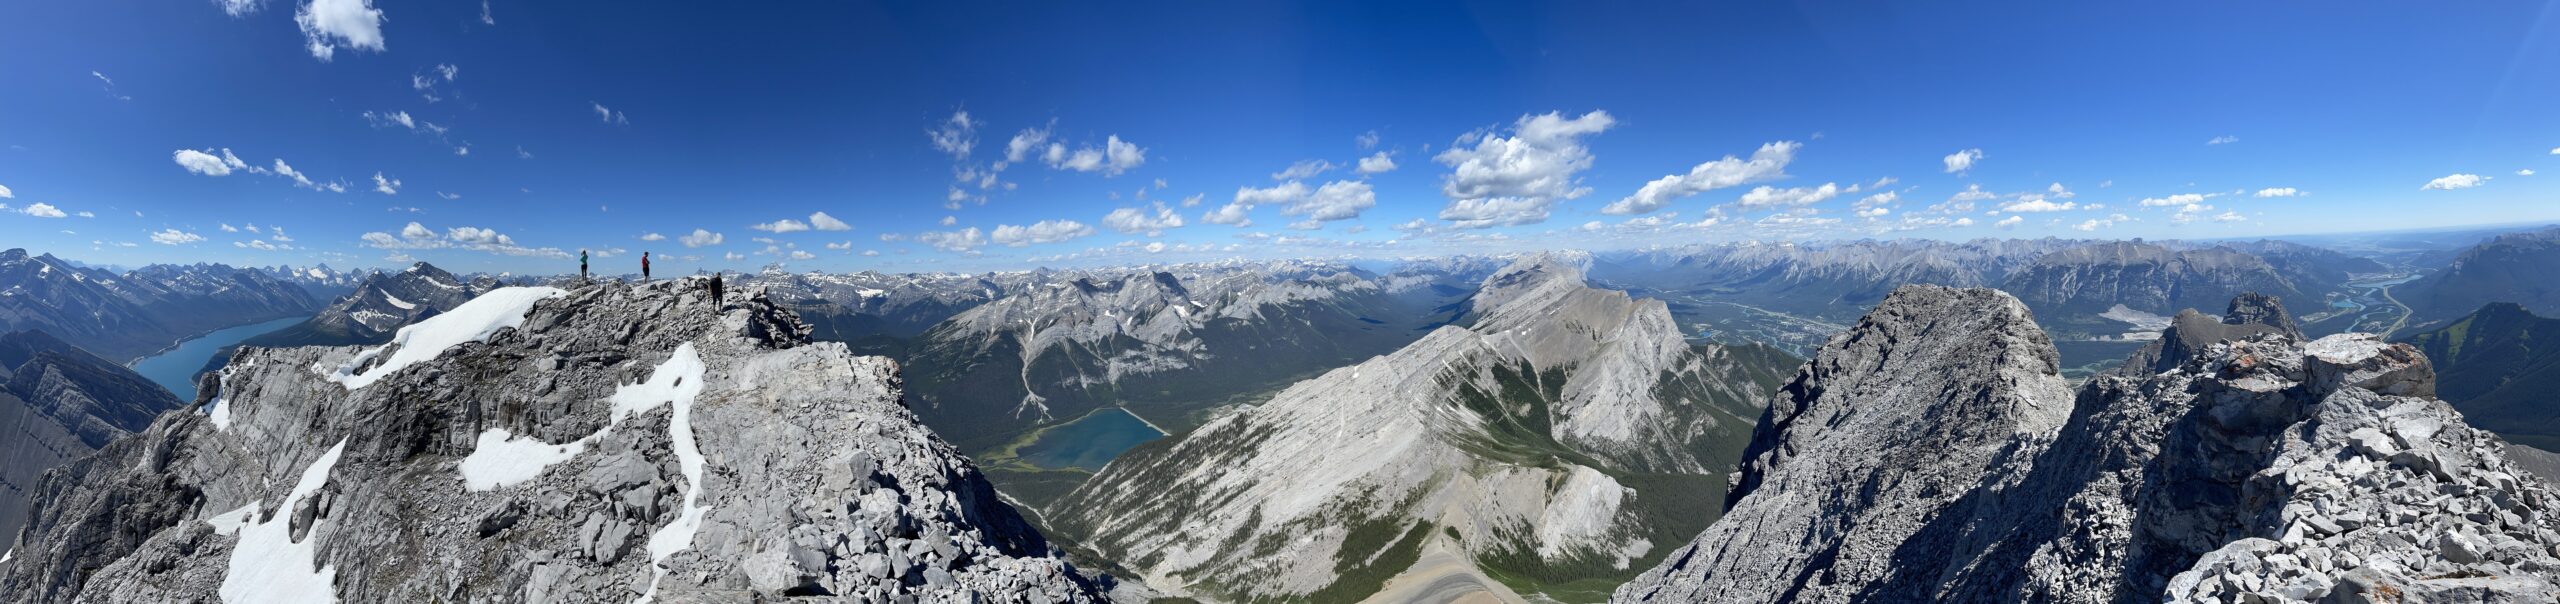
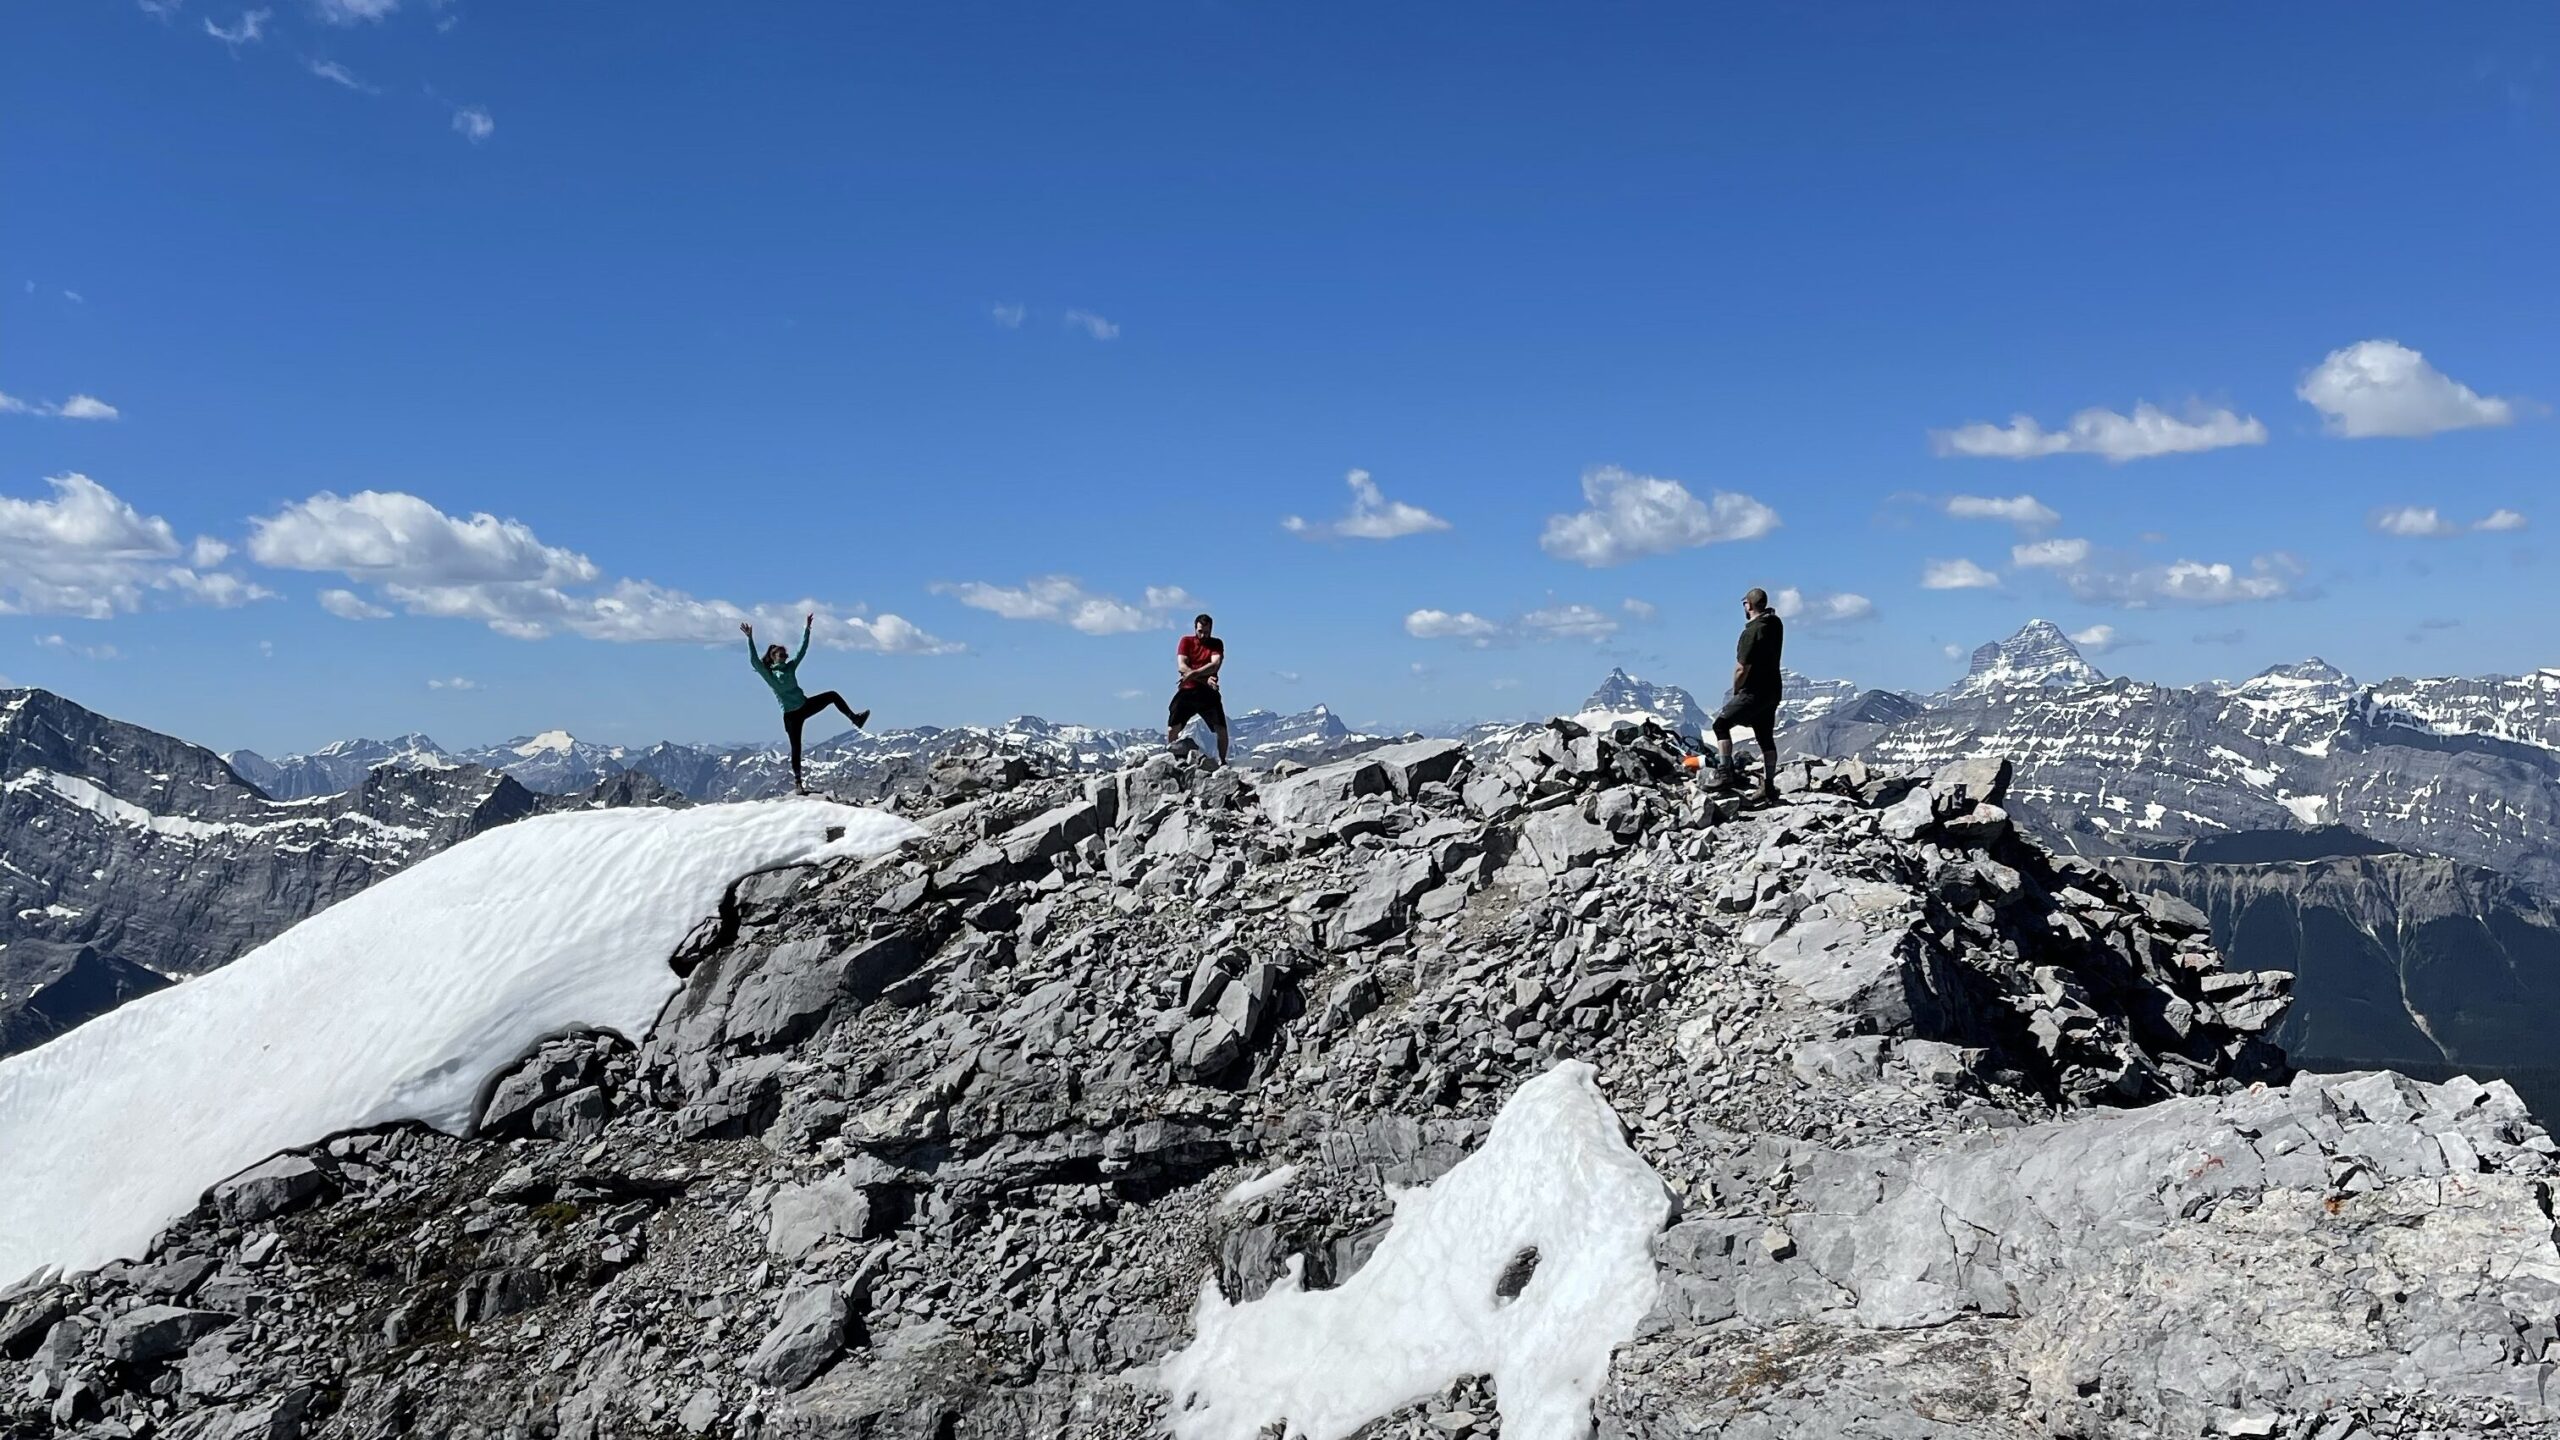
Standing on the top of Big Sister in Canmore, Alberta is truly one of the most spectacular views in the area, though you will have to work hard to get there. I have summited the mountain three times, and although it’s a grind, it remains one of my favorites to date.
Bis Sister is a steep and unrelenting scramble to the top, and should only be attempted by those with previous scrambling experience. However, if you’re up for the challenge, you’re in for such a great reward.
If you’re looking for a wild and difficult adventure, Big Sister might be the one for you!
Big Sister Fast Facts
- “Big Sister” is the tallest of “The Three Sisters” in Canmore – one of the most iconic and identifiable mountains in the Bow Valley.
- “Big Sister” is actually named Hope Peak, though no one ever calls it by that name. It is almost always referred to as Big Sister.
- Alpine Helicopters has an excursion where you can pay to climb abord a helicopter and take a fly-by around the Three Sisters. However, standing on the top of Big Sister, it sure feels like you’re higher than the helicopters!
- Big Sister is one of the steepest ascents in the area, though most of it is easy scrambling with a few moderate scrambling areas thrown in. For an easier journey, check out Middle Sister instead.
Big Sister Quick Stats
- Distance – 5.6km / 3.5 mi
- Elevation Gain – 1258 m / 4,127 ft
- Approximate Time – 7-10 hours
- All Season Hike? No, summer and early fall only
- Dog Friendly? No
- Kid Friendly? No
- Beginner Friendly? No
- Cell Service? Yes, at the summit
- Wildlife Encounters? Possible bears
- Access to Water? No
- Bathrooms? No
- Chance of getting lost? Moderate
Driving Directions & Where to Park for Big Sister
Drive through the town of Canmore, turning right up towards the Nordic Center. Continue along on this winding Spray Lakes Road, and as a fair warning, about 2 minutes past the Nordic Center the road will become quite narrow and will turn to very rough gravel.
Continue cautiously along the gravel road, past Whiteman’s Pond, and past the Goat Creek or Ha Ling parking lot. You will likely lose cell service around this area.
You will cross over a small concrete bridge next to Goat Pond about 5 minutes past the Ha Ling parking lot, then the road will become slightly less narrow.
Keep driving down this rugged road for about 10 more minutes, just until you reach the very start of the Spray Lakes. The Bis Sister parking lot is a large grassy field off on your lefthand side, though you can also park at the start of the lake on your righthand side.
How to Get to the Big Sister Trailhead
From the parking lot, walk uphill for 4-5 minutes until you see the large dried creek bed. Look across the creek bed for a trail in the trees or flagging tape (brightly colored strips of plastic) tied to trees. There also might be a faint trail or cairns (piled rocks) in the creek bed to help indicate the way.
This is how I recommend you start this hike as the trail is obvious and well-marked through the trees.
However, there is an alternate route that AllTrails suggests, which is continuing up the creek bed for about 15 minutes before following a trail up and to the left. I have used this trail and I find it to be poorly marked and confusing, but it is a legitimate trail and does eventually meet up with the other route.
There is no official signage for this hike.
How To Hike Big Sister Successfully
The “Big Sister” hike can be broken down into segments to better understand the parts of the trail that you can anticipate. Here are the portions of the trail as I see them:
1. The Start
The start of the hike is uphill from the parking lot for about 4 minutes, then determining which trail you want to choose.
The trail I would suggest is the one I previously mentioned, which crosses the dry creek bed and picks up an obvious beaten-in dirt trail in the trees on the far side. It is often marked by cairns (rock piles) in the creek bed and flagging tape in the trees.
If you use AllTrails, the trail I would suggest is the black dotted line on the main map. The alternate trail is indicated by the red line on AllTrails, and is achieved by continuing along the creek bed, which I will describe later in this article.
There is nothing hard or technical about the start of this hike, but route-finding can be an issue.
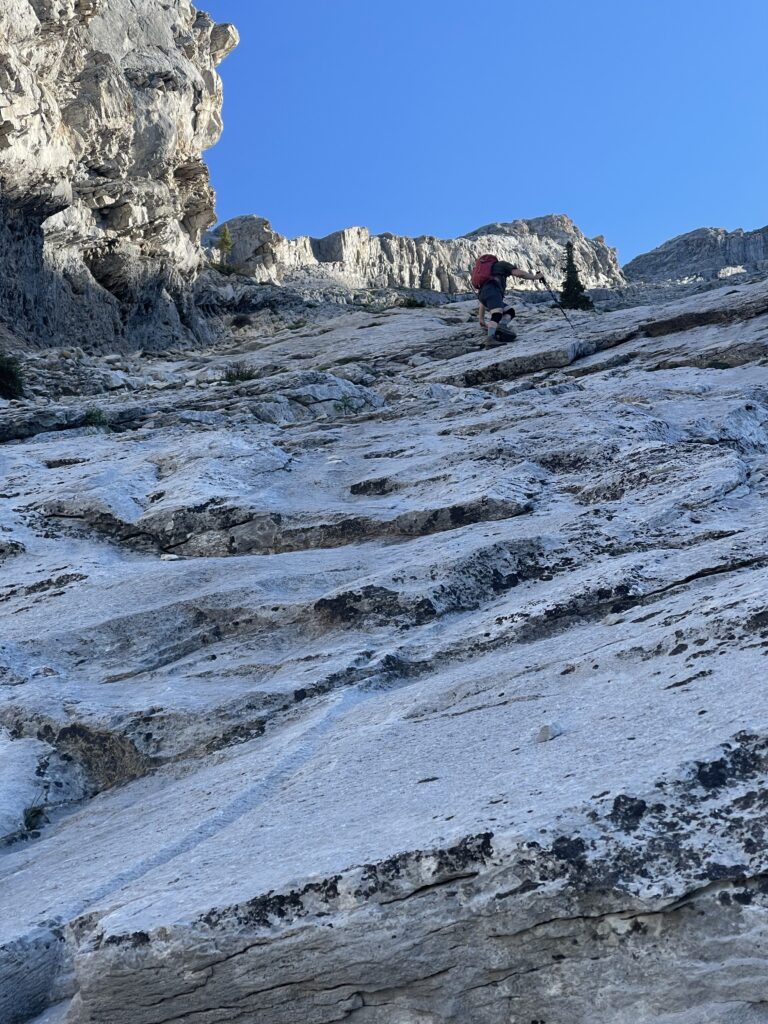
2. The Trees
After you have gained the trail across the creek bed, you begin a steep ascent through the trees. The trail here is very obvious, essentially hiking straight up a dirt path through the trees towards the top of the mountain.
Poles are very helpful for this section, and you will have to take some big steps over exposed rock and roots. Try to be efficient through this part of the hike so you have more time in the difficult sections later.
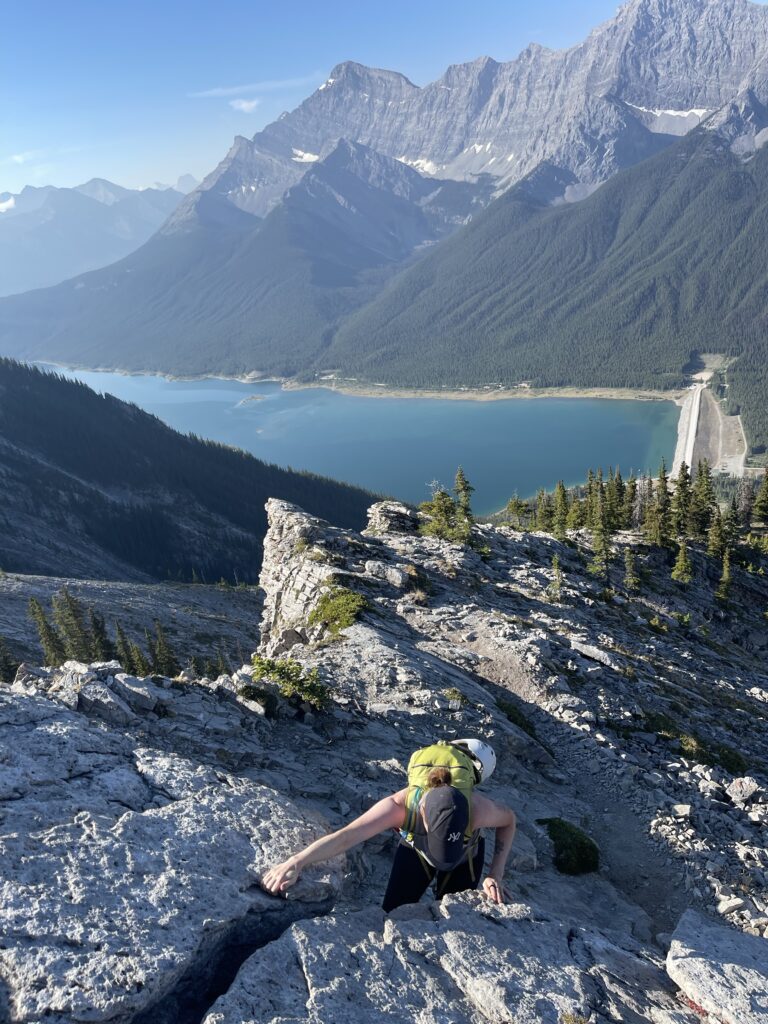
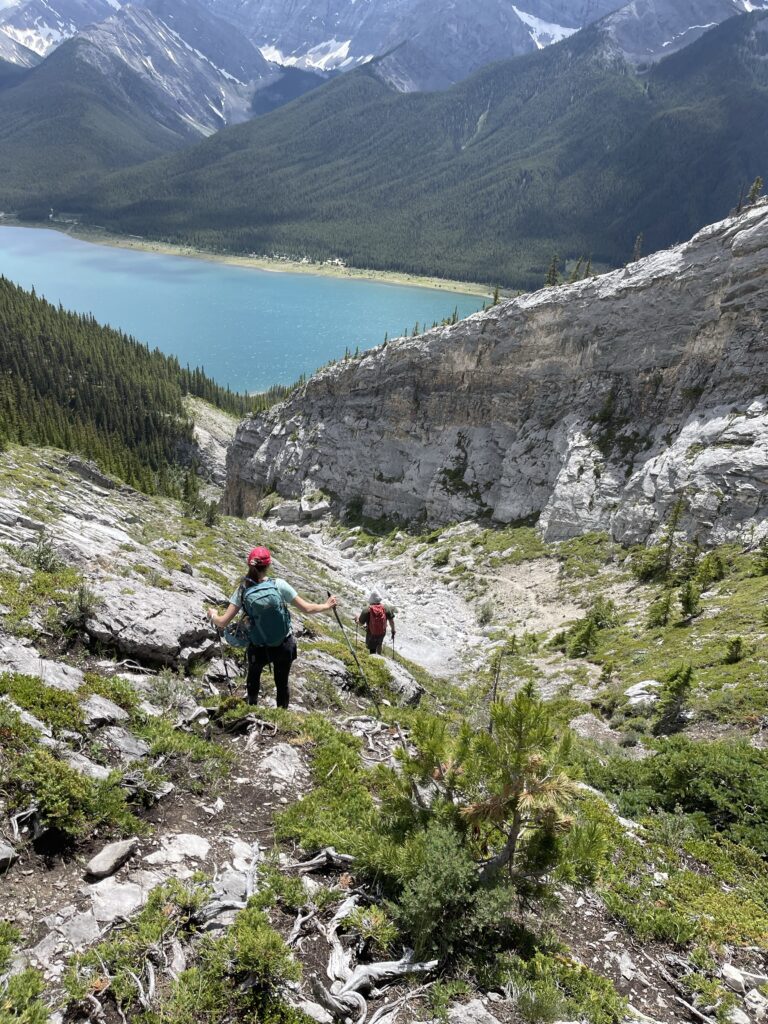
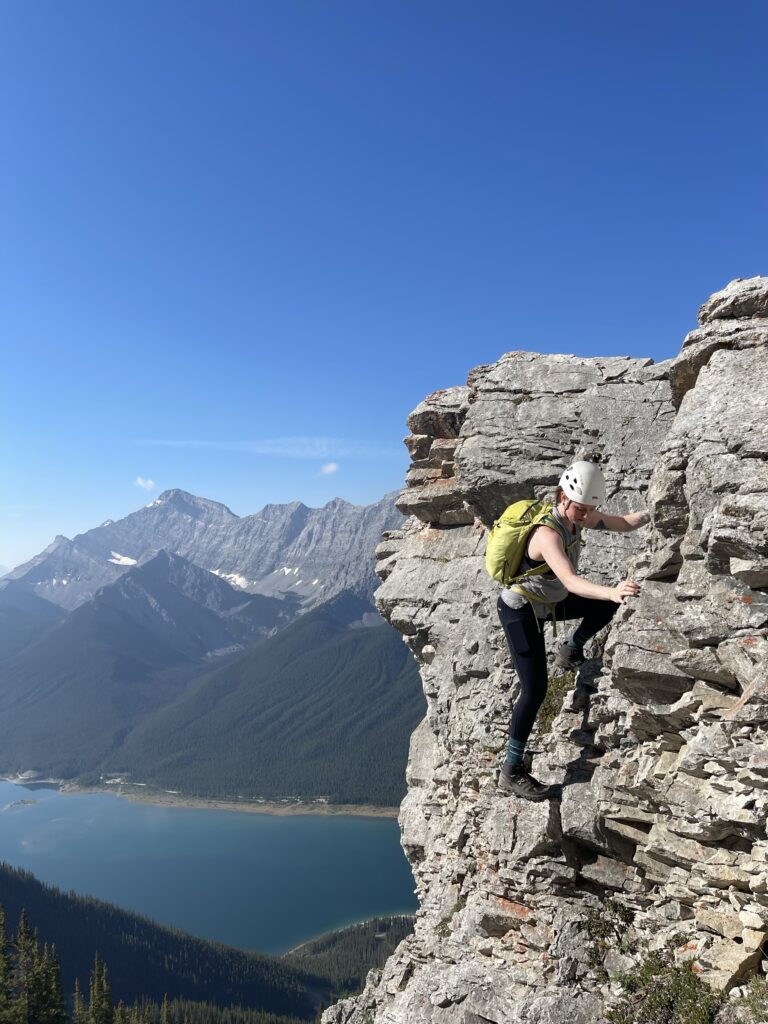
3. Option 1: The Canyon
Right as you break the tree line, there will be a trail leading you down and to the right, often marked with flagging tape in the trees. This trail will pull you down into the canyon for a very long and tedious ascent.
If you aren’t confident with route-finding or scrambling, this is the route I would suggest. It will feel like a long time hiking up loose rock, but it is a fairly safe option, but this is the time to put your helmet on.
Once you enter the canyon, you are essentially just hiking up this line until the ridge far above you on hiker’s left (the lefthand side as you’re ascending) meets the canyon.
The canyon is made up of rocks of varying size, sometimes on large flat slab rocks. I recommend staying near to the tall ridge on the left to help guide your journey, wandering a few meters in either direction where you feel the terrain is easiest to travel up.
I personally find the slab easier to hike up on the way down, and the small rocks easier to sink into on the way down.
Please be aware that there might be hikers above you on the ridge to your left, or ascending either in front or behind you in the canyon. Rockfall (or dropped gear) is a real hazard. You should absolutely hike with a helmet on after the tree line.
Please also be mindful in this section as you hike down, as it can be quite slippery on the shallow rock. Your weight should always be into the mountain so that a slip will have you falling on your bum and not toppling over head-first.
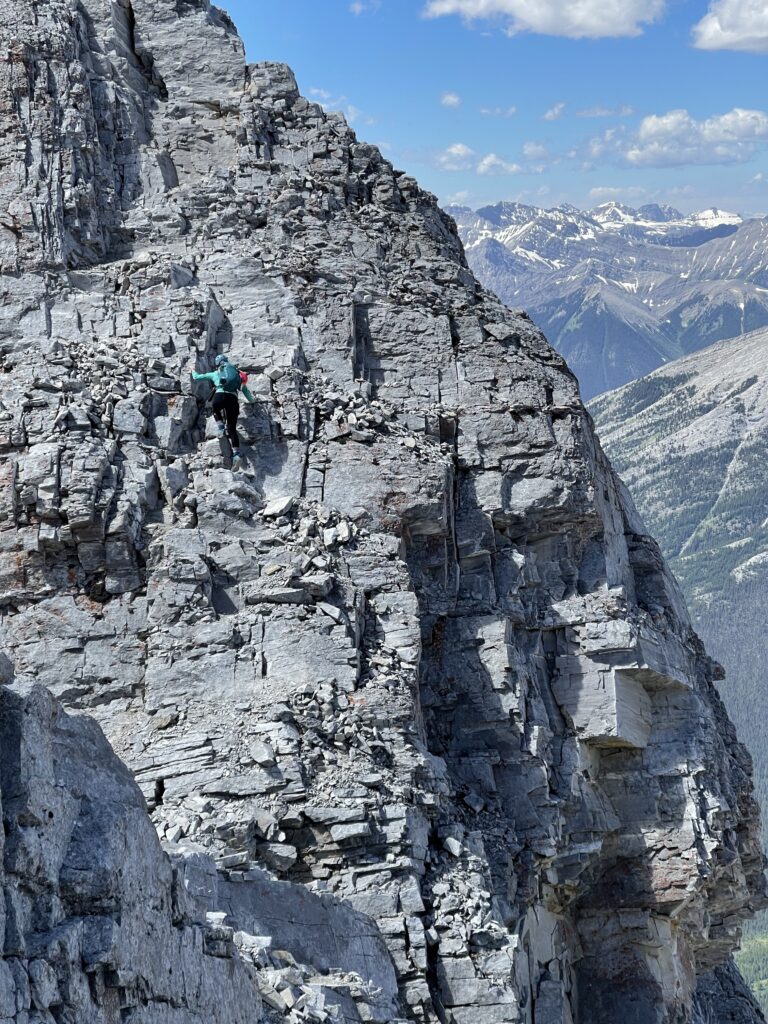
4. Option 2: The Ridge
If you are a confident scrambler, ignore the trail that goes down to the right as you break the tree line and stay up on the ridge instead.
The ridge is made up of mostly chunks of steep slab. You will absolutely need your hands from time to time, so I would recommend tucking your poles away to give you the freedom you need for scrambling.
The ridge has some easier sections and some more difficult sections, but nothing should feel like you’re fifth-class rock climbing (meaning vertical moves).
If you have started along the ridge and feel like it’s a bit committing, there are two spots where you can downclimb into the canyon for an easier ascent. These spots are sometimes marked with flagging tape on small trees or rocks, but is not a guarantee.
Downclimbing on an unmarked trail can be risky because it’s difficult to see how steep the way down is. If you plan on descending into the canyon, you should be able to clearly see your path down if you are in the correct location, but you will have to turn around with your face into the ridge to climb down. It is the only safe way.
About three times further up along the ridge, the canyon comes up to meet the ridge. If you’re enjoying scrambling along the ridge, you can keep on the ridge the entire way up. However, these are other options in which you can choose the canyon over the ridge.
There are lots of options to hike Big Sister, and none of them are wrong; it just depends what you feel most comfortable doing.
5. The Downclimb
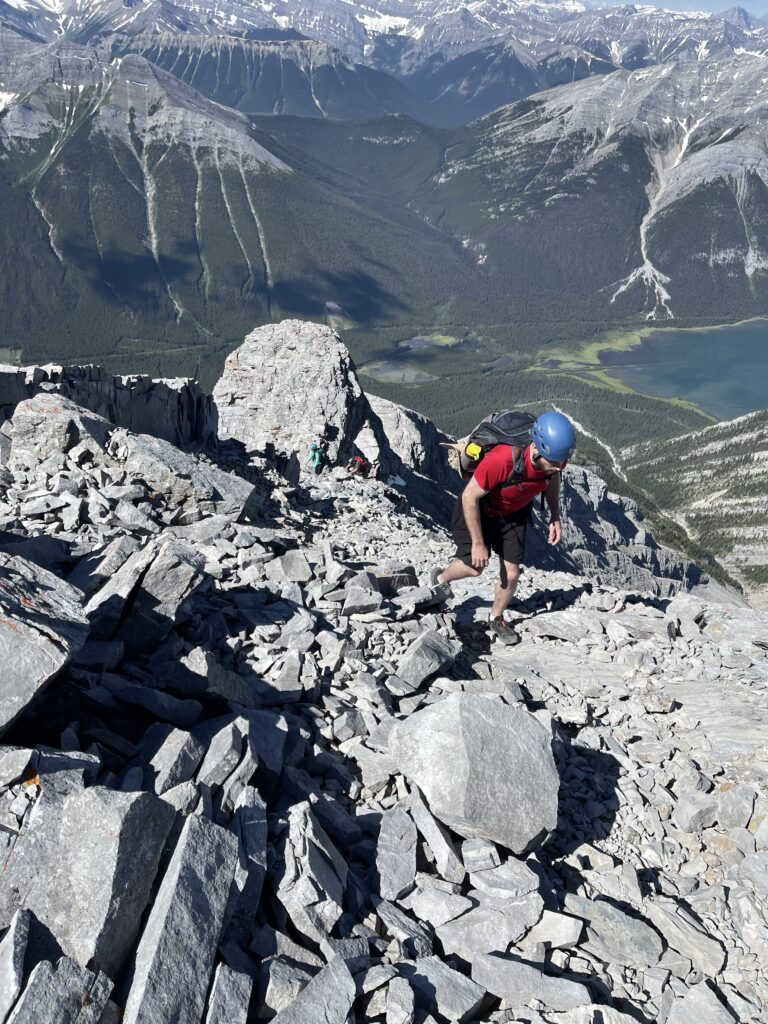
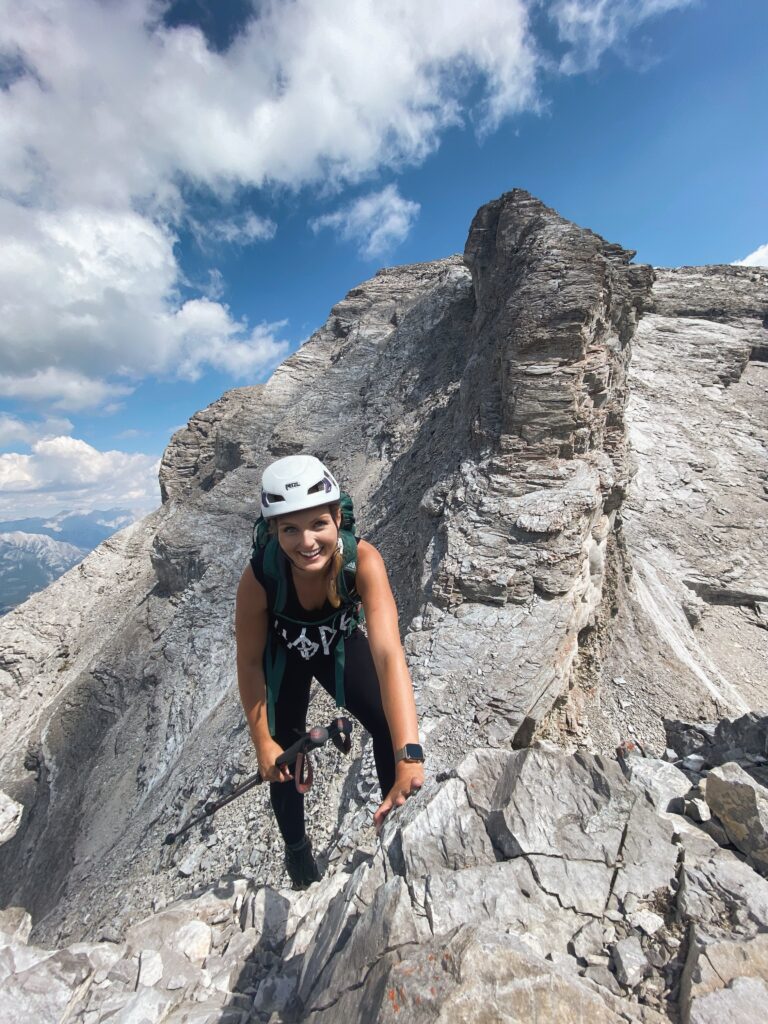
One of the most notable parts of hiking Big Sister is the infamous downclimb section. If you haven’t heard of this section, it’s about a 15-meter section where you need to turn around and face the mountain to climb down backwards. There is no other way to proceed to the summit.
Many hikers turn around at this section because it looks daunting. In my opinion, pictures honestly make it look worse than it is.
The first step feels the worst as you slowly inch yourself off the side of the rocks, hoping to find a place for your foot to land. However, once you trust yourself enough to look down, you’ll realize the downclimb is full of ledges that you have plenty of space to stand on.
If you don’t like scrambling or heights, you won’t like this section. I wouldn’t recommend trying it without experience. However, if you enjoy a thrill and a good scramble, this is truly a fun section.
Take your time coming down, ensuring that each hand and foot is in a solid stance before lowering yourself to the next section. Climbing down on the way to the summit is more intimidating than climbing back up it on the way out.
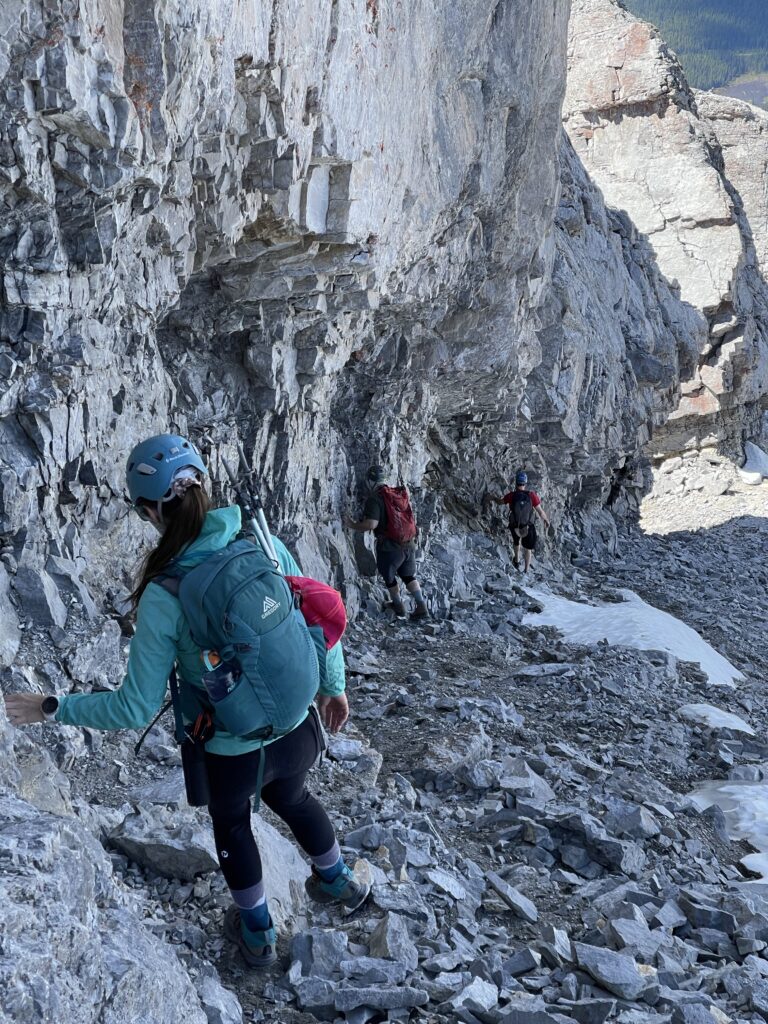
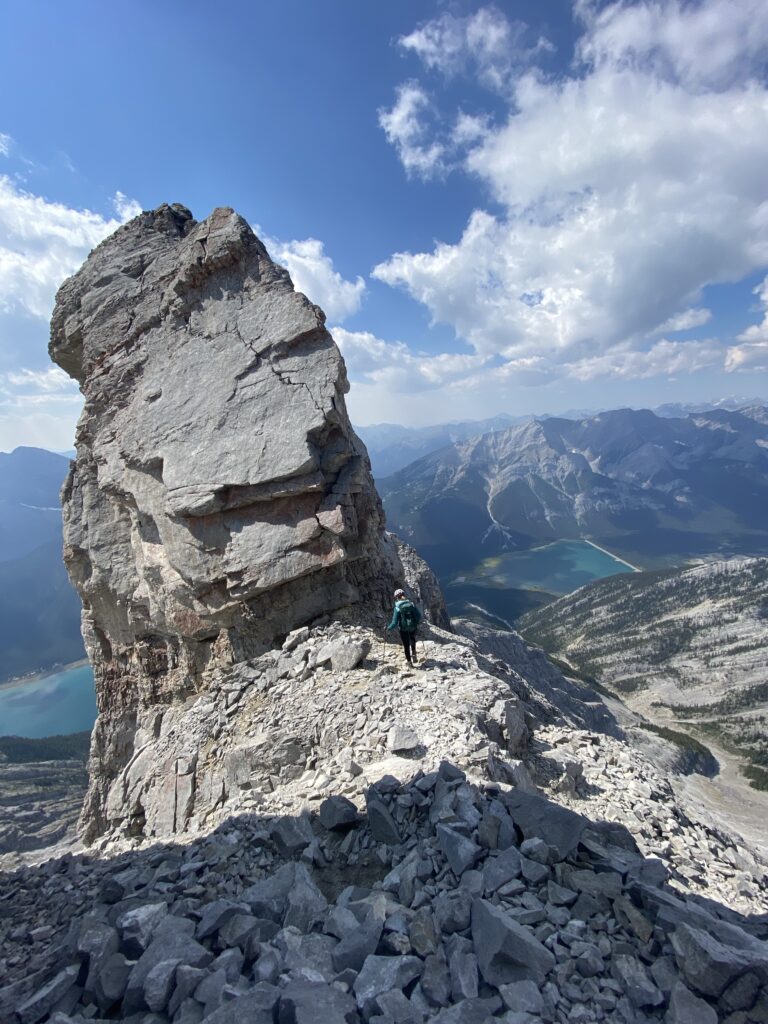
6. The Pinnacles
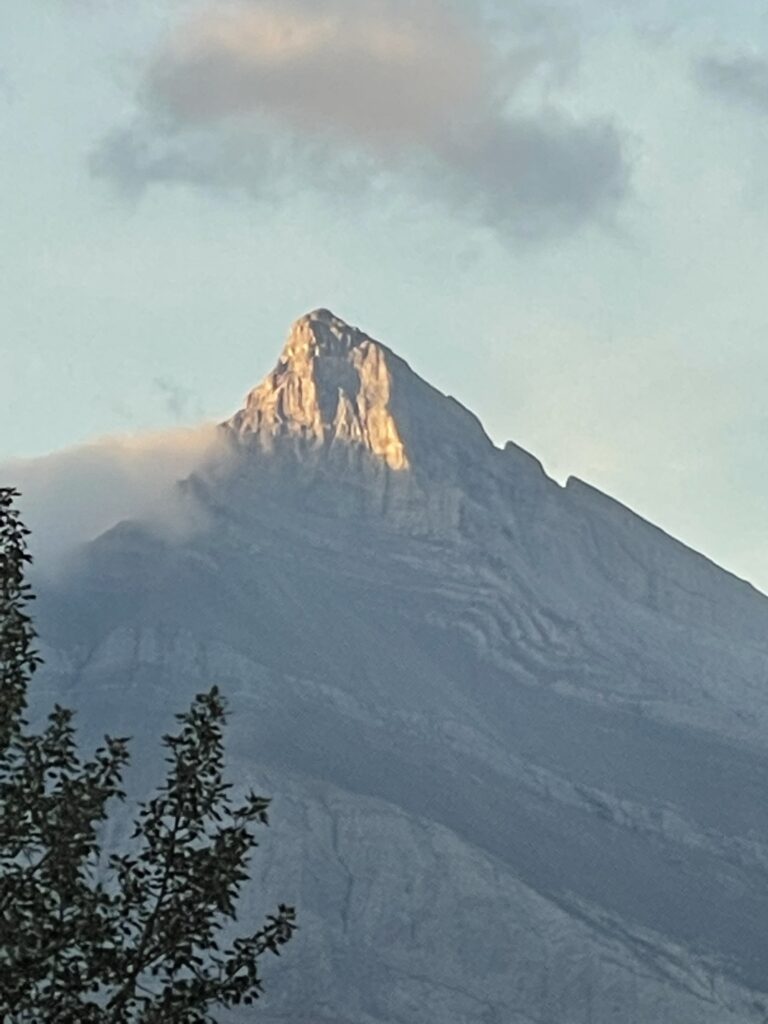
One very cool feature about Big Sister is the pinnacles. These are two large rock towers that can actually be seen from the town of Canmore, though they look more like jagged teeth from afar.
You will be able to see the pinnacles from the top of the downclimb before you make your way down. They look daunting, but you simply have to pass by them on hiker’s left, which is actually reasonably easy.
At the bottom of the downclimb, the path should be obvious leading you down and around the pinnacles to hiker’s left.
There is no scrambling around the sides of these rock pillars, though this area remains shaded and cooler for a long time into the summer months. If this area has lots of snow remaining, I wouldn’t recommend trying to proceed any further.
The problem with hiking past the pinnacles is exposure to the hiker’s lefthand side. (Exposure means a large drop with no protection). You have about two meters between the pinnacles and the edge, which is plenty of space, however, caution should be exercised to prevent a fall.
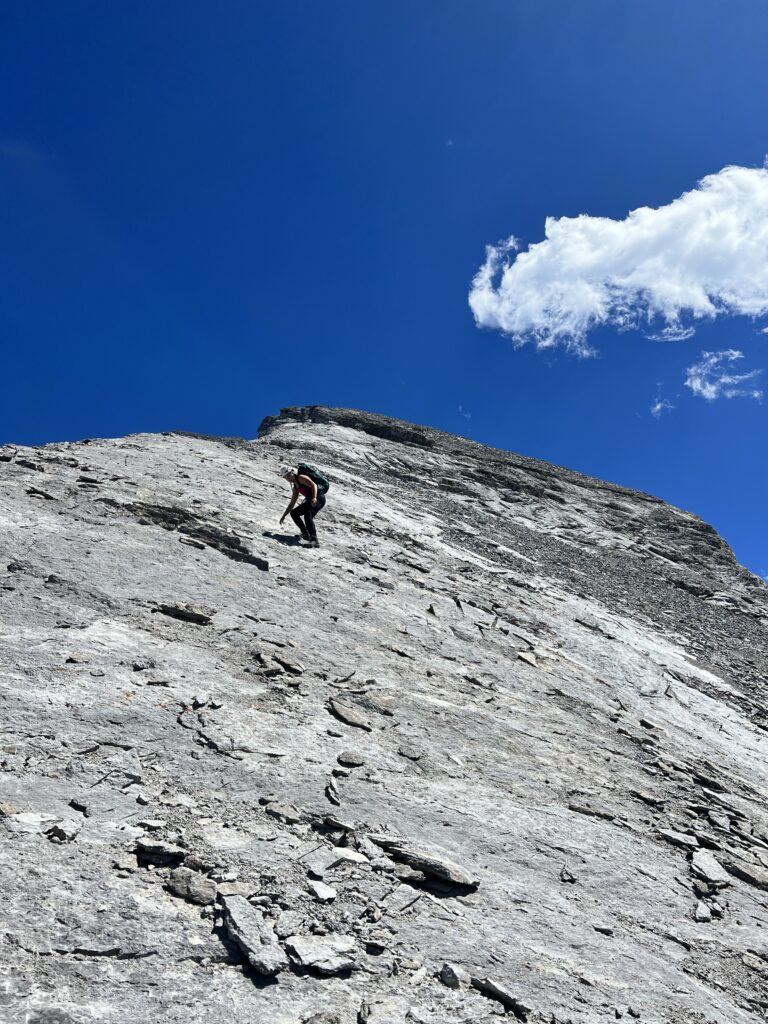
7. The Final Push and The Summit
Once you’re past the pinnacles, there isn’t much further to go until you’re at the summit. The trail mostly disappears, but you can see the summit just off and to the left.
The way the mountain is formed, there is higher rock in line with where the pinnacles are, and this is where you want to stay until the summit, heading a few feet to the left or right depending on where the easier scrambling is. You will still need your hands occasionally for a few steps, but the scrambling is much easier here.
Avoid going too far hiker’s right off the mini ridge that the higher rocks create, as the rock to the right is loose scree and is much more difficult and unsafe to ascend.
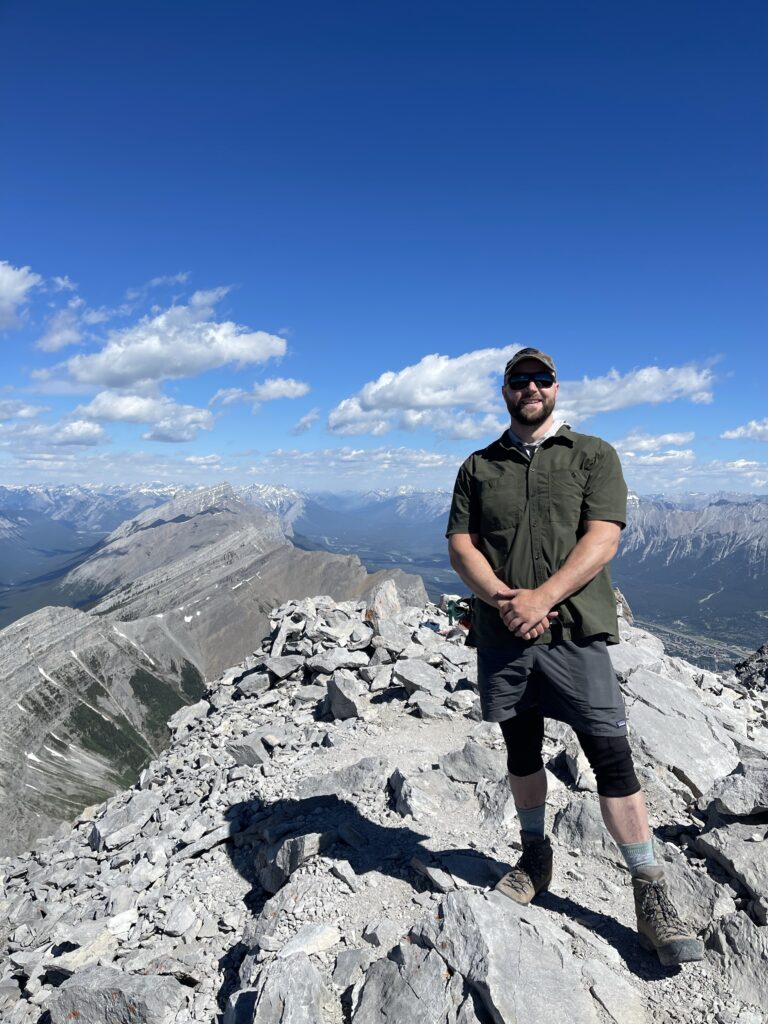
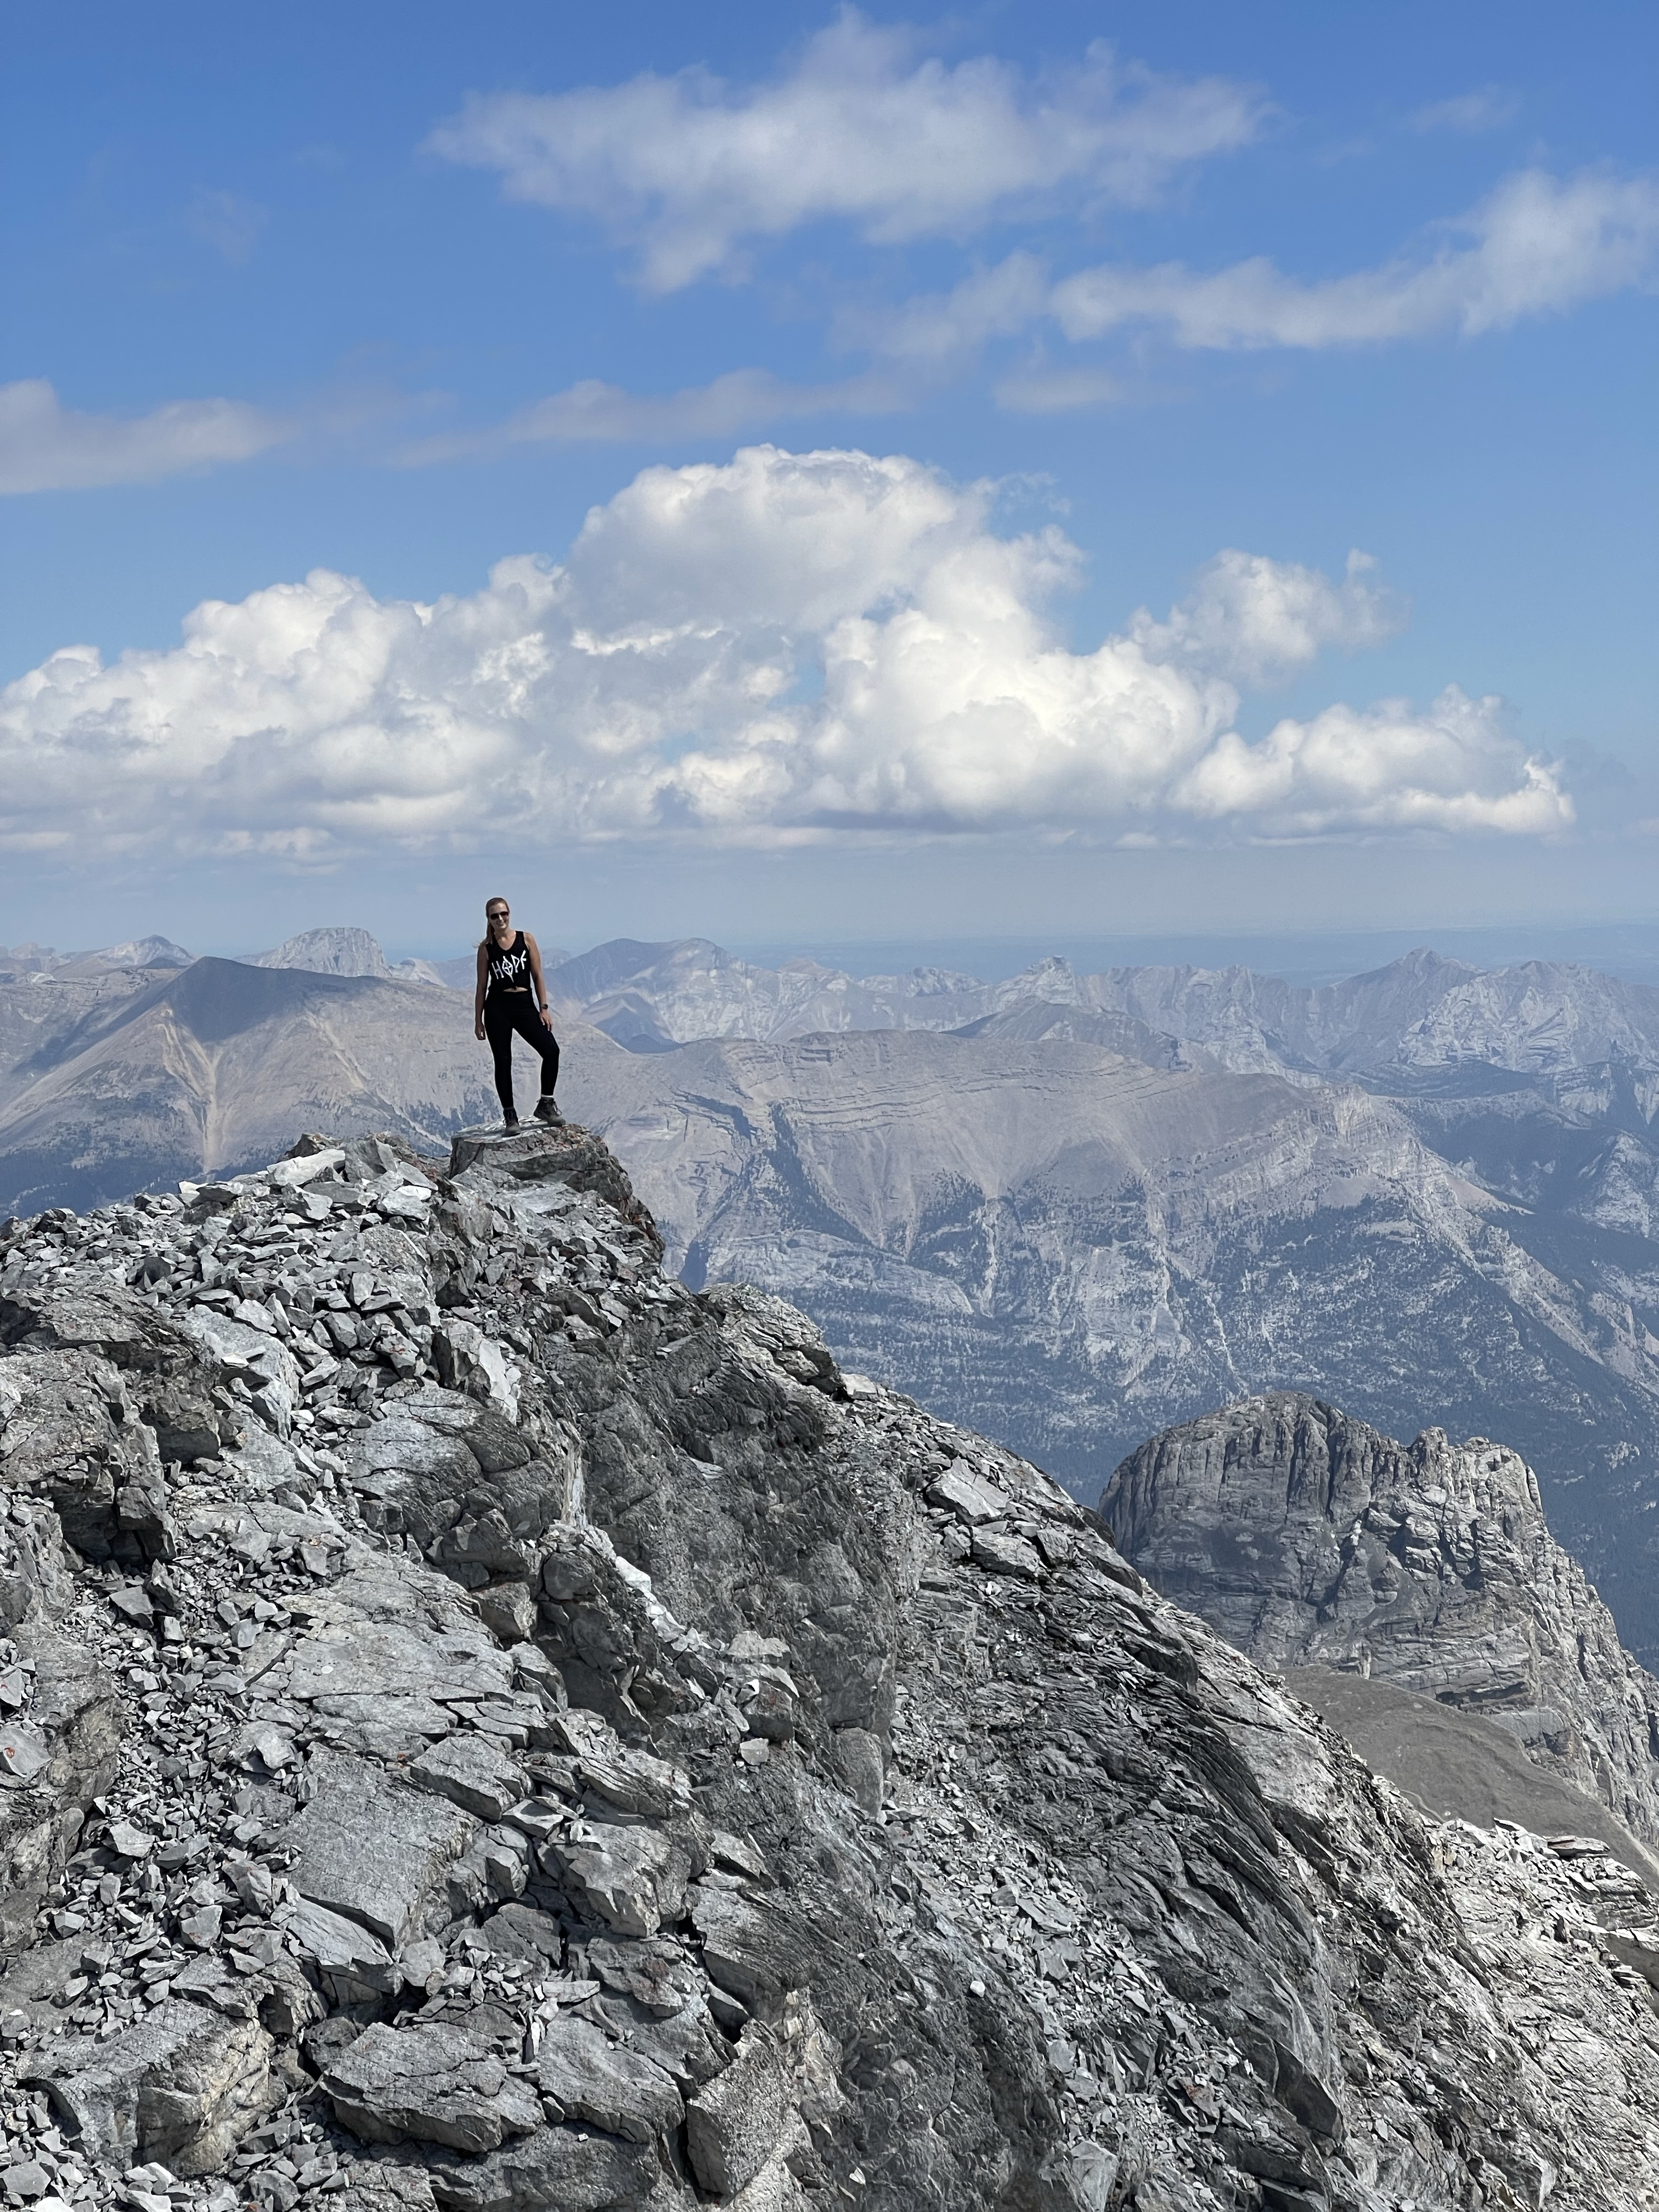
It will likely take you about 10 minutes after the pinnacles to summit, and it is truly a spectacular view.
There is likely a small wind shelter (a pile of rocks built in the shape of a curve) for you to hide behind if the chilly winds pick up. As well, you probably will find a large container containing a pad of paper and a writing utensil (known as a “summit register”) where you can leave your name and the date to commemorate your accomplishment.
8. The Alternate Route
The alternate route is a bit less steep, though the trail is not as well marked. This trail also spends the entire hike down in the canyon instead of coming up onto the ridge.
If you follow the suggested route via AllTrails, this is the route it will take you on. It is a valid trail and if you find yourself on it, there is nothing wrong with it. Just be mindful that rockfall is always a possibility and check your GPS often to ensure you’re on trail.
To use this trail, as you hike up from the parking lot, stay hiker’s right of the creek until the creek starts to bend up and hiker’s left. As the creek bends away, you want to descend into the creek and keep your eyes open for flagging tape and markers.
The trail continues up the rock in the creek for a bit before meandering hiker’s right, then eventually crossing back hiker’s left. This trail is not as well beaten in and can be hard to follow in some denser wooded areas. A GPS is highly recommended.
Hikers often accidentally find themselves on this trail on their descent, as they miss the section where the trail splits. To avoid this trail on the way out, keep your eyes open for sections where the trail might bifurcate in two and always take the skier’s right path (the righthand side on the way out).
Best “Intragrammable” Moments on Big Sister
Big Sister is one of my favorite mountains for photographs. There are so many moments that make this hike special, and it’s easy to capture them in photos.
It’s also easy to make this hike look more intense than it is. Not to say that Big Sister should be underestimated – it is a huge undertaking and has significant risk. However, there is an artistry to photography, and there are tricks that people utilize to make angles look steeper, climbs look taller, and perspective look grander than is reality.
1. The Canyon
Pictures in the canyon section really show how much effort you put in to hike Big Sister. It is the first time the views start to open up of the Spray Lakes behind you, and you can see how sharply the ridge rises above you. If you hike early enough, you can get some beautiful morning sunlight lighting up the canyon as well.
Take pictures of your group hiking up with their helmets on and the Spray Lakes glistening in the background, or take a picture of them hiking up alongside the large ridge.
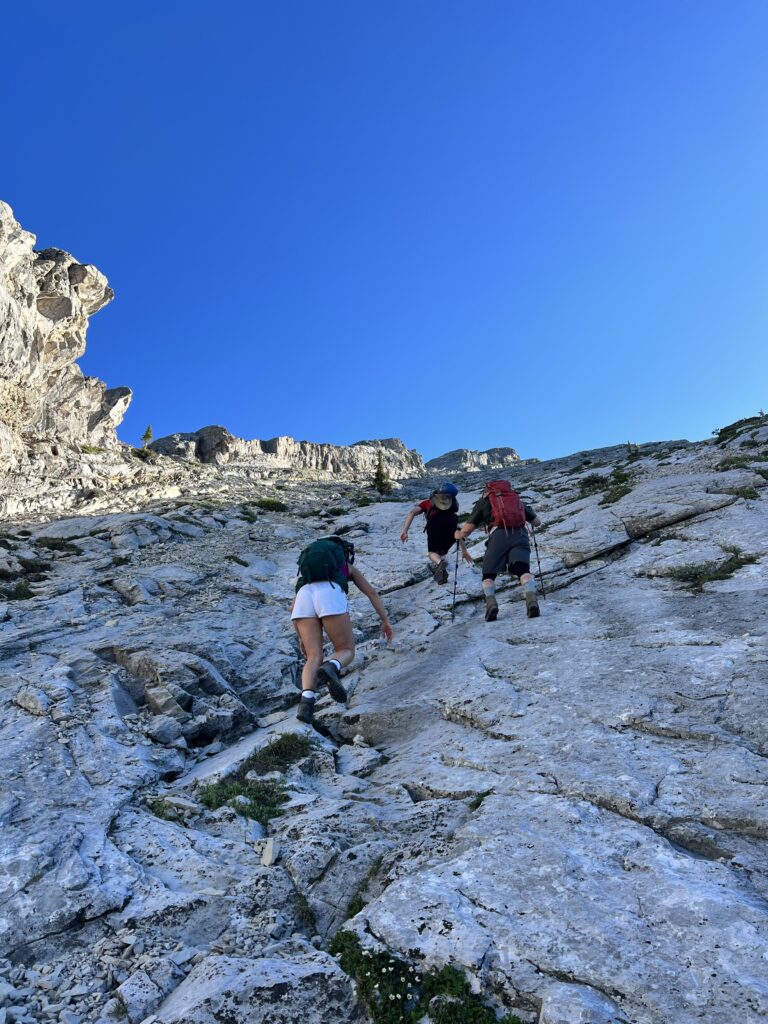
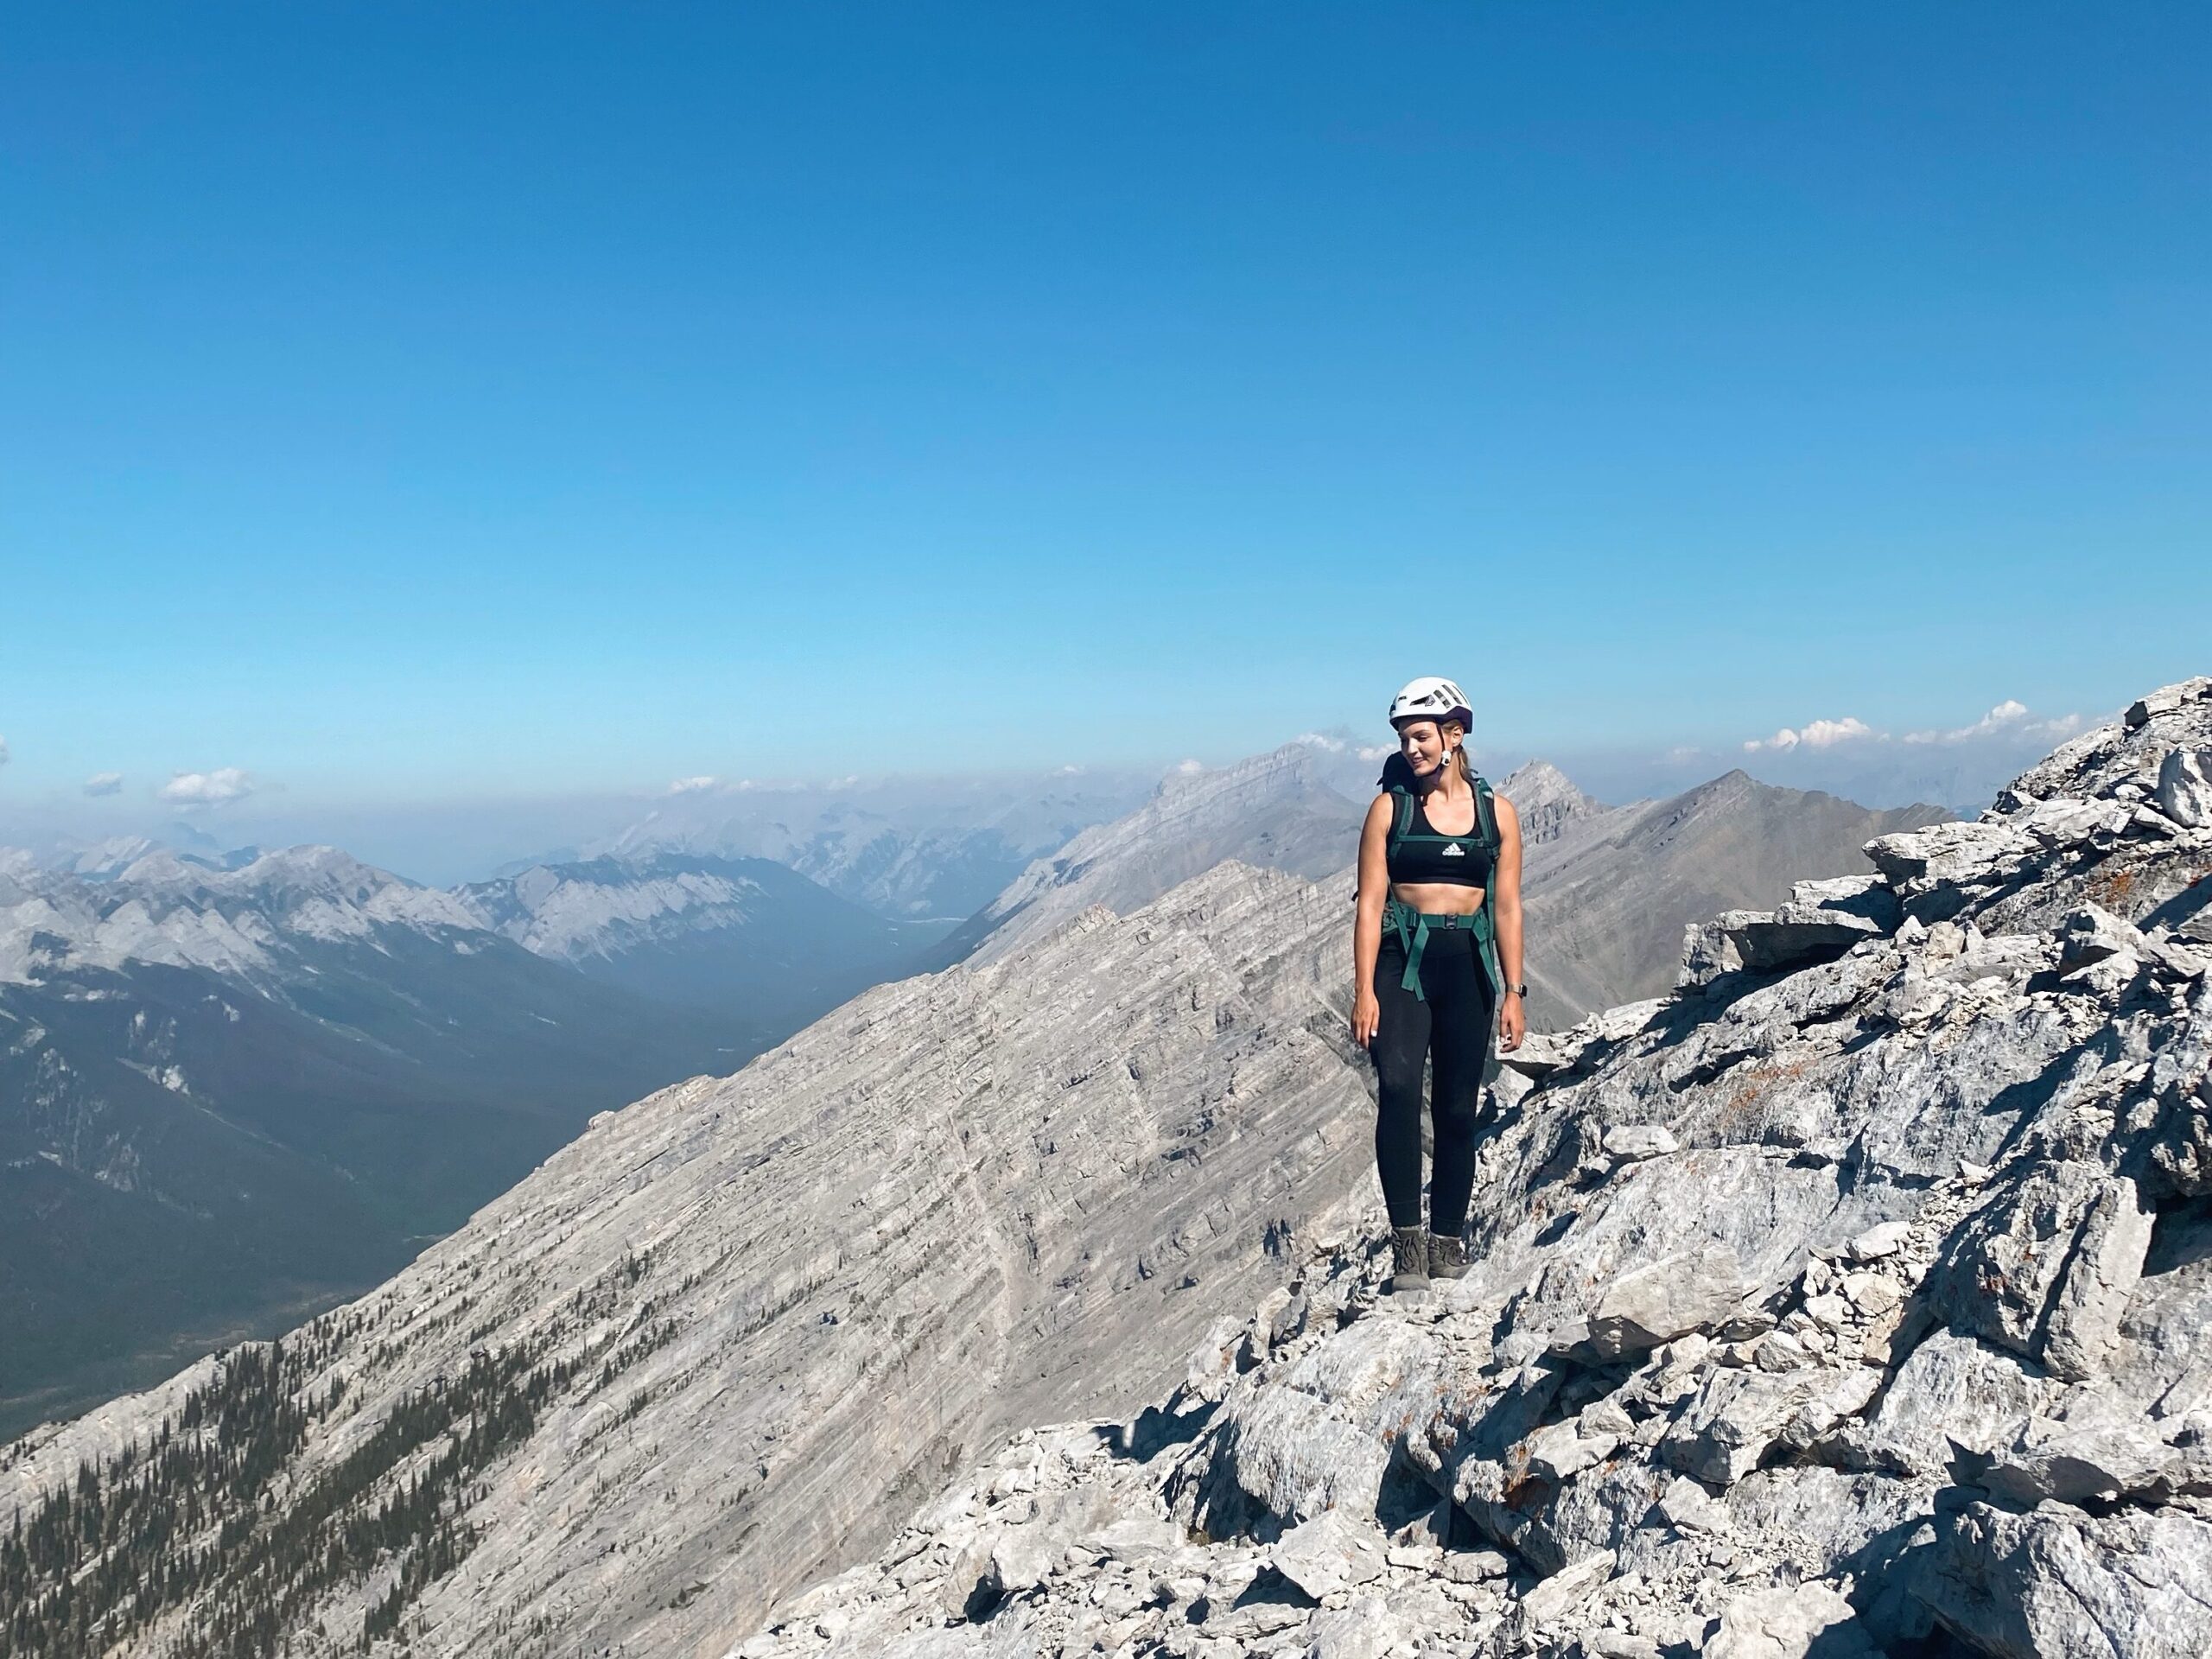
2. The Ridge
On the ridge you can get some really cool photos of you and your crew scrambling up the mountain. Take turns in the steeper sections so that the observer is always in a secure stance (especially if you want to take a photo).
For any steeper scrambling sections, take photos of your friends from the side to show exactly how technical the moves are, or from above to get some perspective. Avoid taking photos directly below someone scrambling as this puts you in the rockfall zone and simply gets pictures of their bum.
If you choose to downclimb into the canyon, these can make some cool “climbing” photos as well.
3. The Downclimb
The downclimb is one of the most photographed sections on Big Sister and can produce some scary-looking results.
There are so many cool ways to take pictures here. If your friends are climbing down before you, stand on top of the ridge and take photos as they descend. If they feel comfortable, get them to smile up at you with the massive pinnacles in the background.
Move back a few steps (carefully!) to make the climber’s left exposure look even more dramatic as your friends downclimb.
Depending on how committed you are, if you stand on the summit and take pictures of your friends on top of the downclimb, this will also make the section look overly dramatic.
Another suggestion is on the way out, stand beside the pinnacle closest to the downclimb and take a picture of your friends climbing up, as the lack of contrast will make the climb look almost vertical (which it’s not.)
4. The Pinnacles
The pinnacles are easy to photograph, mostly because they’re such interesting rock structures.
Firstly, take pictures of your friends hiking beside these massive structures. Try a wide-angle lens (like 0.5 on a phone) to have perspective of the size.
Secondly, after you pass the first pinnacle, you can actually stand between the two pinnacles. Take some easy selfies here as the views are spectacular.
Thirdly, once you pass the second pinnacle, take photos of where you just came from, as the towers of rock really do loom over you, and the downclimb section lurks in the background.
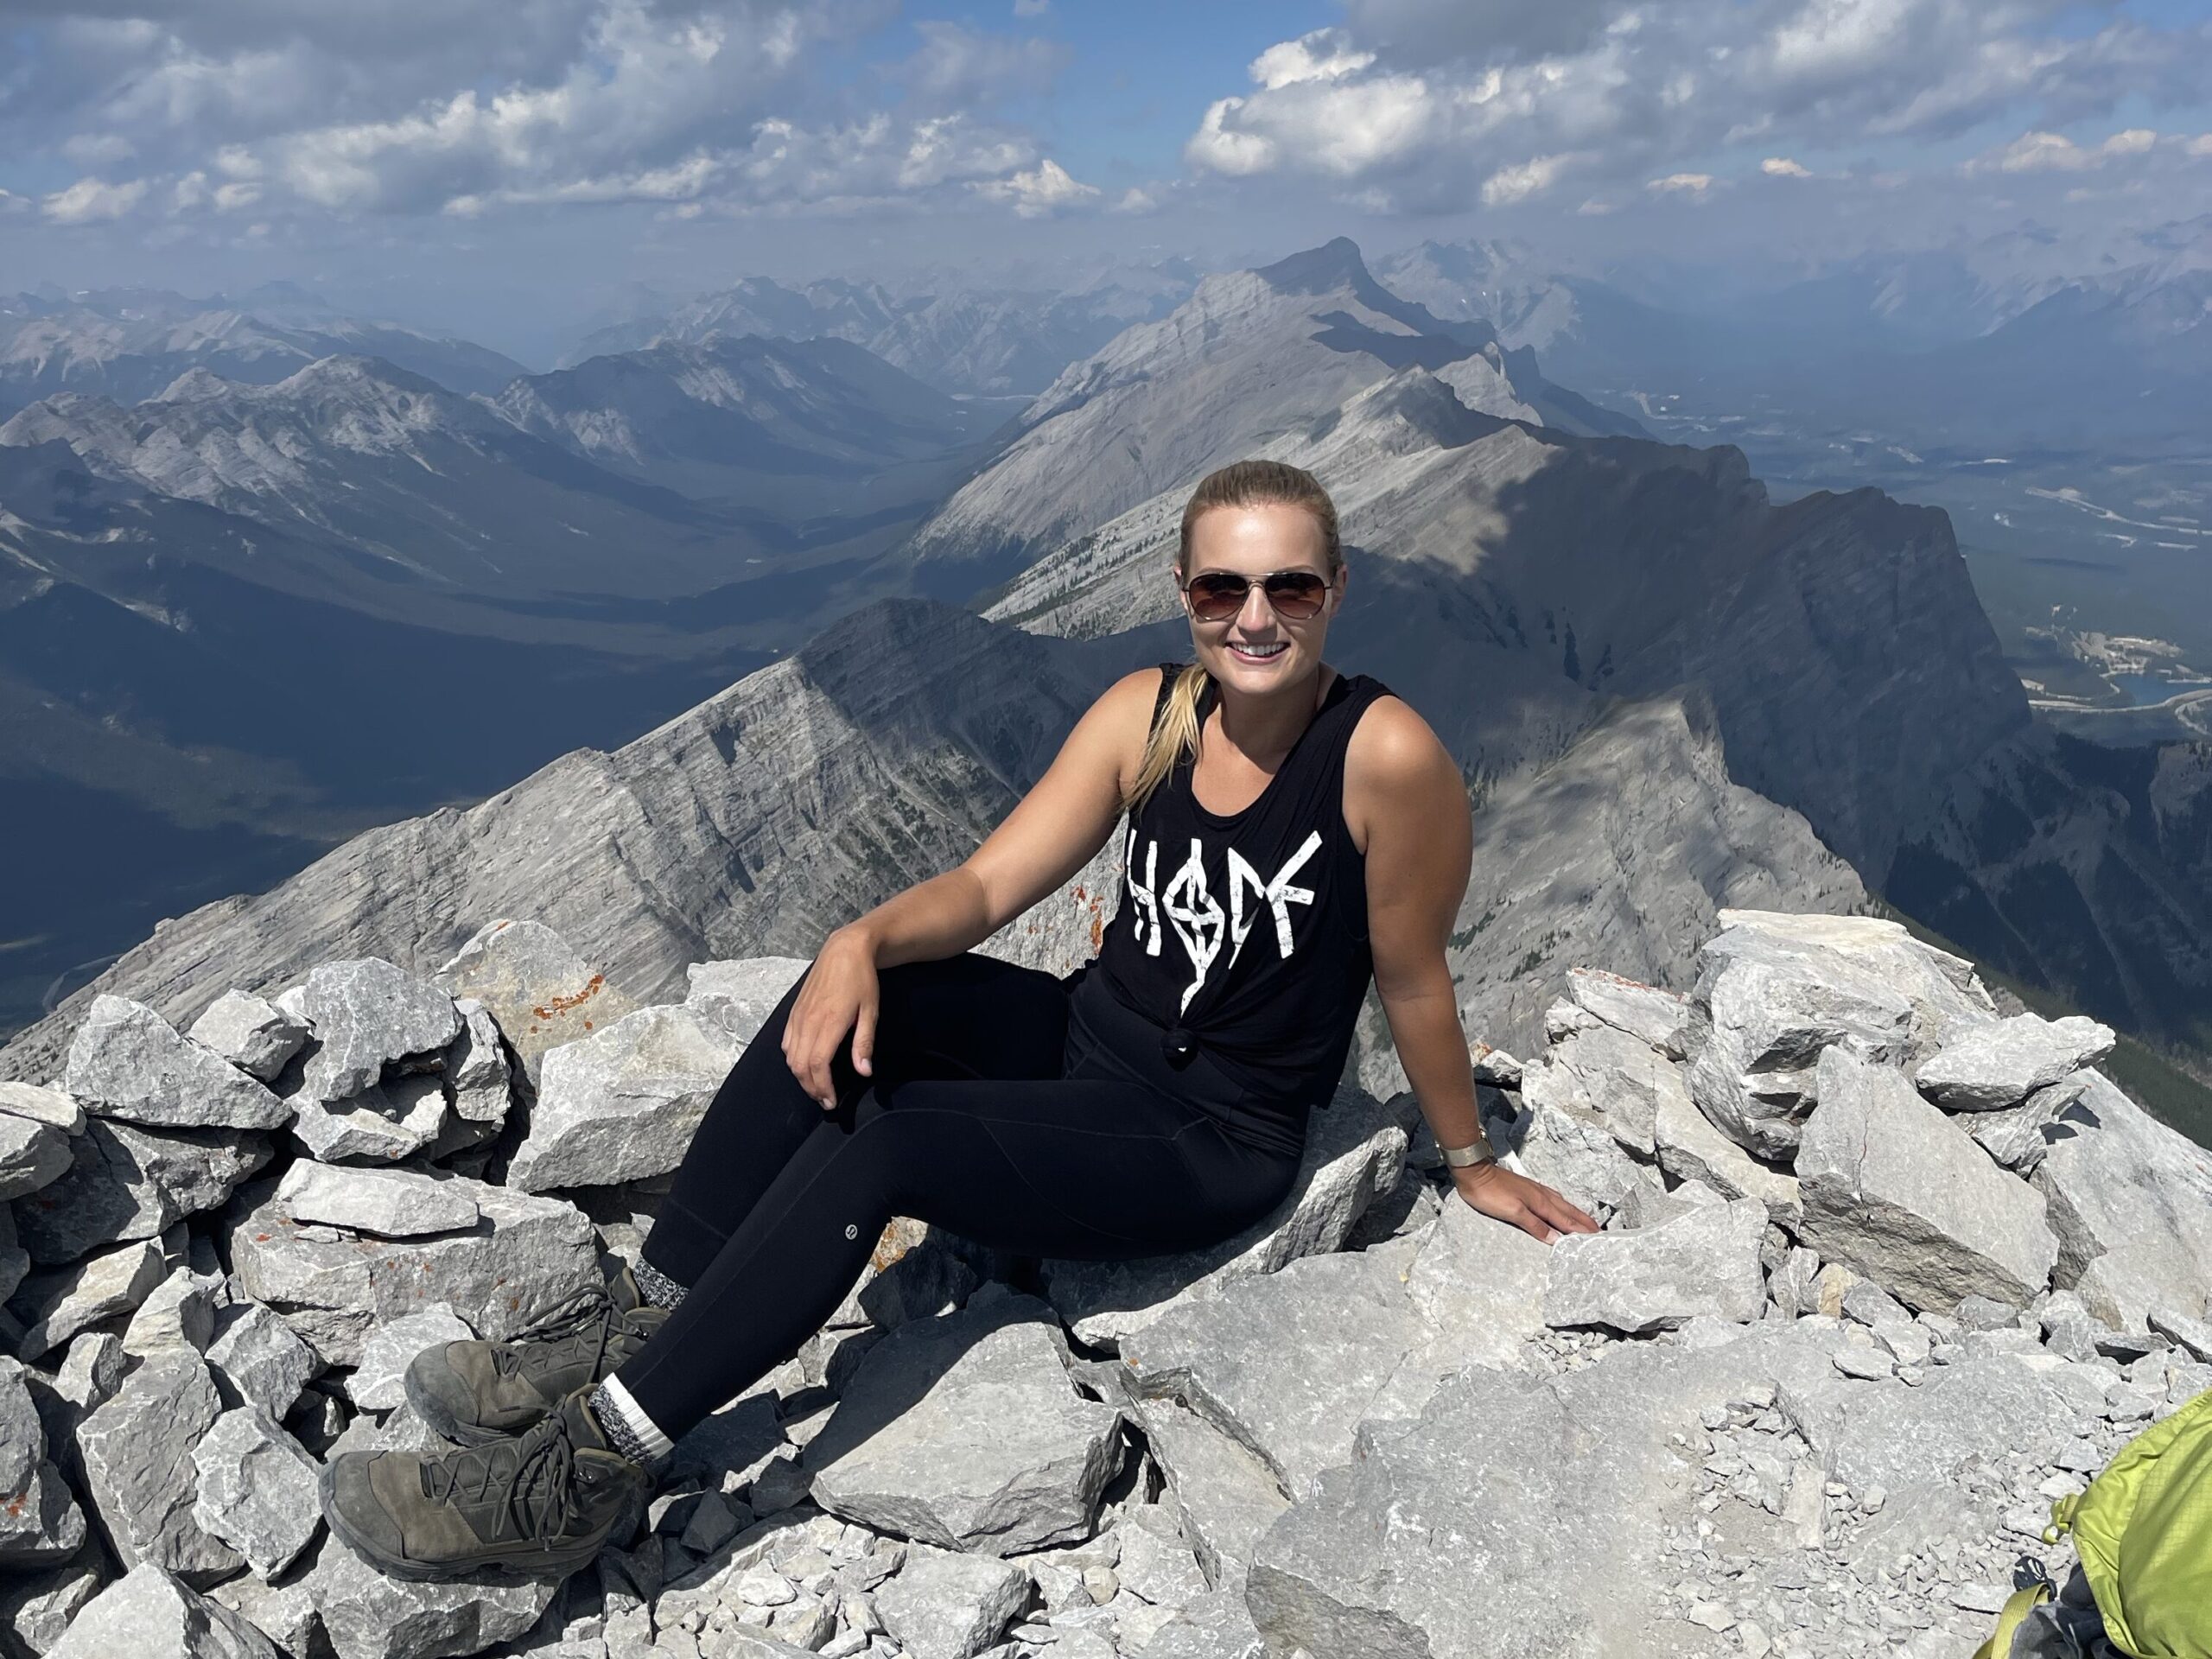
5. The Summit
Big Sister has some of the most spectacular views in the Bow Valley, mostly because it’s such a massive mountain. On a clear day you can see so many notable mountains in the distance.
Besides the obvious summit photos in all directions, there is actually a small outcropping of rocks that you can scramble to just north of the summit register towards the town of Canmore. It will take about 1 minute of scrambling to get to a nice spot where you can pose for photos. Have your friends stand at the summit and take photos of you out on these rocks.
While you’re out on the rocks, take pictures of your friends on the summit and vice versa.
As well, if you can get your friends to wander down the ridge about 2 minutes east, past where you hiked up, you can get some amazing cliff-like photos with the Spray Lakes in the background.

What to Bring When Hiking Big Sister
Most of the time when I hike, my pack consistently contains the same things – warm layers, wind layers, food, water, bear spray. However, there are some things I make sure that I have when hiking up Big Sister.
- Helmet – You’re likely to see pictures of people scrambling up Big Sister without helmets, but please don’t follow suit. There is a huge risk of rockfall on this hike, and as well, because of the steep incline, exposure, and scrambling, you’re at increased risk of head injury from a slip.
- Carabiners – I like to make sure I have a few cheap non-locking carabiners available to me during scrambles. Anything loose on my pack (a water bottle in a side pouch, for instance) I carabiner to the outside to prevent it from falling on parties below me if I lean over too far. (I’m speaking from experience here).
- Sunscreen – There is very little shade throughout this hike. Be prepared for excessive sun exposure throughout the day.
- Satellite Phone – Because Big Sister is a moderate scramble with some technical sections, it is imperative to have a method to call for help if needed. Don’t rely on a cell phone (unless you have the emergency SOS feature), as cell service isn’t guaranteed.
Big Sister Tips To Get The Best Experience
- Start Early – Getting an early start is important for two reasons. Firstly, it ensures you have plenty of daylight to complete this hike since it will likely take you at least 8 hours. Secondly, if you start early, you’re likely to have fewer groups ahead of you on the mountain which can pose rockfall hazard.
- Wear Helmets – It doesn’t matter if you think it looks cooler to not wear a helmet; it’s a matter of safety. Helmets protect your noggin’ from falling rock, falling objects, or if you happen to fall.
- Download a GPS Track – There are so many different routes to summit this mountain, but you might think you’re on a trail that isn’t one. Have a GPS track as a safety and check it from time to time to ensure you’re heading on one of the trails.
- Hike With Others – I have hiked this mountain both alone and with other people, and let me tell you, it’s so much better with other people. Also, it can be safer to have other people around to double check safety measures and call for help if needed. However, watch out for the increased rockfall hazard.
Frequently Asked Questions
How long is the Big Sister hike?
Big Sister in Canmore will likely take 8-10 hours to hike to the summit and return to your vehicle. It is a steep ascent and a moderate scramble and should only be attempted by experienced adventurers.
Is Big Sister open 2023?
Yes, Big Sister in Canmore is open in 2023, though it should only be attempted when the mountain is snow-free, approximately from July to late September.
Is Big Sister a hard hike?
Yes, Big Sister is a hard hike. There is a lot of elevation over a short distance, making the ascent quite steep, and in many places hand-use is required. Route-finding can also be difficult. Big Sister is considered a moderate scramble.
Is Big Sister a dangerous hike?
Yes, Big Sister can be a dangerous hike, as there is technical scrambling, exposed edges, shallow scree, and steep inclines. Slipping and falling can be fatal. However, knowledge and experience can decrease the risk.
Do I need a Kananaskis pass for the Big Sister hike?
Yes, you do need a digital Kananaskis pass to park a car at the Big Sister trailhead. If you’re not parking a car, a pass is not necessary.
Recommendations From My Experience
I have hiked Big Sister 3 times – once alone, and twice with other people. I have never taken the same route twice, not necessarily by choice. Here are some things I have learned:
- This hike is steep and unrelenting. You need some serious mental fortitude to get through it. Give yourself plenty of time on a good weather day because the views are truly incredible.
- Consider tying or attaching loose items to your backpack. I had a water bottle in the side pouch of my backpack going up the canyon, and when I bent forward to use my hands, it slipped out of the pocket and went crashing down the canyon behind me, directly towards another group.
If this happens, yell “ROCK!” loudly. (The reason for this is because if you yell “WATER BOTTLE” or something of the like, parties below you might not understand why you’re yelling. They might correct you later that it wasn’t a rock, but at least they’ll be safe.)
Thankfully, the other group was able to move out of the way as my water bottle bounced a few times then exploded into pieces on a sharp rock. Lesson learned. I personally now use carabiners to attach my water bottle to the pack. This is also why helmets are important.
- Use a GPS track. I have ended up on a different trail every time I’ve hiked this mountain, simply by not paying attention. It’s fine since there are many ways up and down the mountain and I’m a fairly confident scrambler, but it could become precarious if you’re in territory you’re uncomfortable with or you’re uncertain of your location.
Rescues have been done from Big Sister because hikers have gone the wrong way. Use a GPS track and check it often.
- Don’t let the “scary” photos deter you if you’re experienced and confident in scrambling. None of the scrambling was 5th class and photos can be deceiving.
Don’t put yourself in any situation in which you feel uncomfortable, and turn around if you feel unsure or unsafe. But make decisions based off your experience, knowledge, and circumstances, and not because of photos you’ve seen on the internet.
- Consider hiking Middle Sister first to gain similar views with less exposure and scrambling, Lady MacDonald for significant scrambling experience that is less sustained, or EEOR for easier scrambling that is equally sustained.
Other Questions?
Is there something I missed? Do you have some unanswered questions about the trail? Drop a comment below and I’ll get back to you as soon as possible!