
Gap Peak in Canmore (not to be confused with Gap Mountain in Kananaskis) is a true hidden gem in the area. It is actually one of my all-time favorite hikes! Although it is a full day adventure, this hike offers a little bit of everything, and isn’t overrun with tourists (yet).
If you’re looking for a full day adventure, beautiful views, and a little bit of moderate scrambling, Gap Peak might be the adventure for you!
Gap Peak Quick Stats
- Distance – 8.2 km / 5.1 mi
- Elevation Gain – 1139 m / 3, 737 ft
- Approximate Time – 6-8 hours
- All Season Hike? No, not recommended in winter conditions.
- Dog Friendly? Possible, but not recommended.
- Kid Friendly? Possible, but not recommended.
- Beginner Friendly? No
- Cell Service? Spotty, but likely a weak signal throughout.
- Wildlife Encounters? Possible bighorn sheep, bears
- Access to Water? No
- Bathrooms? Outhouses at the trailhead
- Chance of getting lost? Minimal
Driving Directions & Where to Park for Gap Peak
Drive along Highway 1A from either Canmore or Calgary, towards Grotto Mountain Pond. There is a small paved parking lot on the north side of the highway, just beside Grotto Pond. This is ideally where you want to park.
This parking lot also serves the popular Grotto Canyon hike, and gets busy in all seasons, but particularly on weekends. Arrive early to ensure you have a space to park.
If this lot is full, there aren’t many other options. My recommendation would be to park down at the Gap Lake day use area (a small pullout along the lake shore), and to hike the extra 2.7km to the parking lot.
How to Get to the Gap Peak Trailhead
The hike technically starts right from the parking lot. A small trail should be visible on the west end of the lot (opposite the small pond) and is marked with the big information board.
Continue along this trail until you reach the large Baymag plant. On your right, a large rock bed will be visible through a break in the trees, likely closed off with a gate. You want to go past the gate, across the rock bed, and into the trees on the other side. A dirt trail should be visible.
Occasionally this area is marked with flagging tape (bright tape in trees), sticks jammed in the ground, or cairns (large rock piles). However, it cannot be guaranteed that any of these indicators will be present. A GPS is recommended.
This turnoff is where the Gap Peak trail officially begins (as shown on AllTrails), though there is no specific signage visible in the area. If you miss this turnoff, you’ll be on the Grotto Canyon hike, which is a lovely but much easier hike.
How To Hike Gap Peak Successfully
This trail is long, and offers many different terrain options to navigate through. Here is the trail broken down into sections as I see them:
1. The Trees
The first portion of this hike is an uphill jaunt through the forest. The trail hits the ridge of the mountain and essentially follows it straight up, without any switchbacks. The incline is fairly moderate here, so setting a good pace and maintaining it will help you manage the time it takes to complete this hike more efficiently.
The trail is small but obvious. As long as you have broken off the Grotto Canyon trail and have found the Gap Peak trail, the way forward should be straightforward. Unfortunately there aren’t many views through the trees.
2. The Cliff Bands
As you break the tree line, a large cliff will be visible directly in front of you. Head towards the cliff. When you are close enough to touch the cliff, the trail will skirt along the base of the cliff on your right.
Follow the trail along the side of the cliff until the sharp incline of the cliff becomes more gradual and turns into a hill. Once the grade lessens, you will be able to walk up the hill to the top of the cliff. This section will be steep, but shouldn’t feel like climbing.
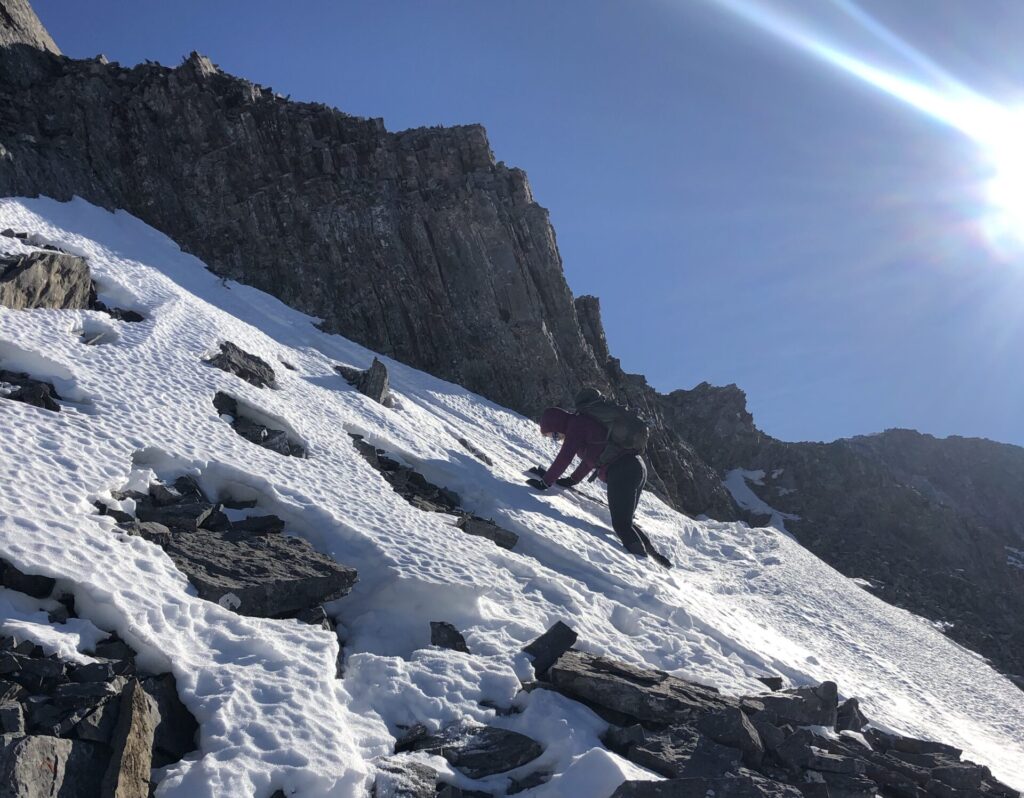
In shoulder seasons, this section might be muddy, and the weather can vary. It is often very windy as you break the tree line, and the east side of the mountain tends to hold snow longer than the west side.
If there is snow along the right side of the cliff, I would recommend persevering through, as you will eventually end up on the west side of the mountain where the sun tends to melt the snow much faster.
When you have hiked up to the top of the cliff band, you will be back on the ridge. A second cliff band will be visible in the distance. Continue hiking along the ridge until you can touch this cliff, where you will then traverse along the left side of the cliff this time. Be cautious of rockfall, which is unlikely, but still possible.
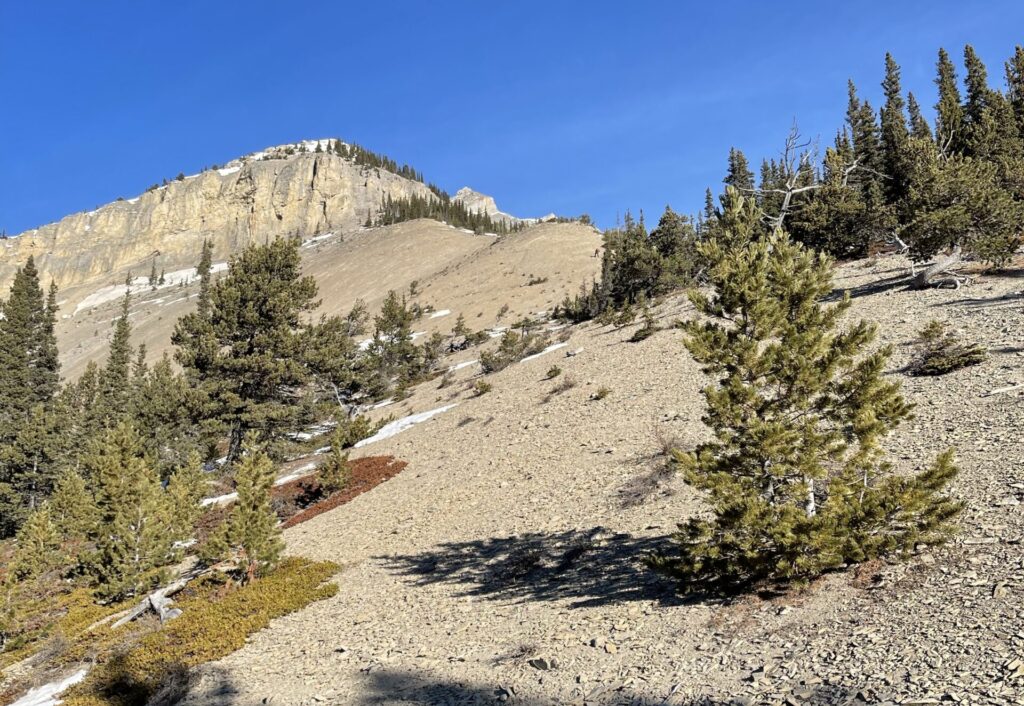

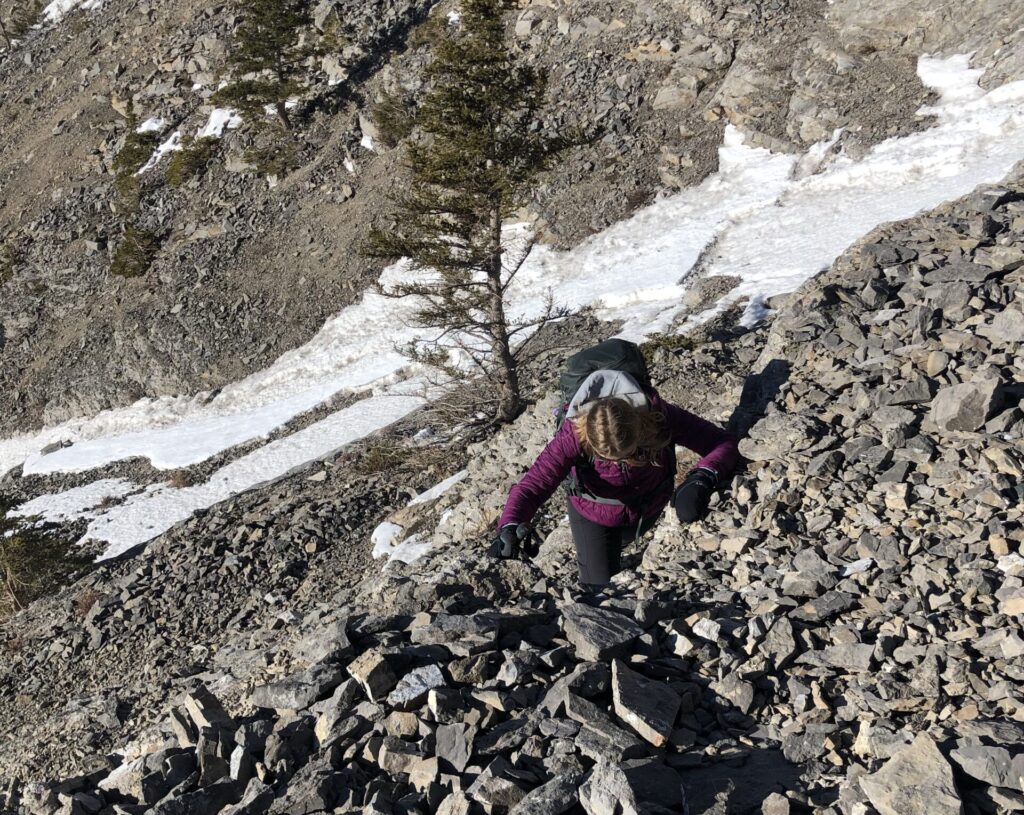
3. The Scree
When you have passed the second cliff, you will enter a large scree field. (Scree is small loose rock). You need to hike up to the top of this scree field, with the high point being on your right just as you pass the cliff.
You will need to use your hands to scramble up a rock step to get onto the main section of the scree field, but the scrambling should be minimal.
As you hike up the scree field, large rock pillars (known as pinnacles) will be visible on the horizon to your left. If you head towards these pinnacles, the rock under your feet tends to be more stable for hiking up, and the pinnacles are fun to explore.
However, there is no “correct” way up the scree. If you don’t want to head to the pinnacles and prefer to hike up the middle of the bowl, that is completely ok too.
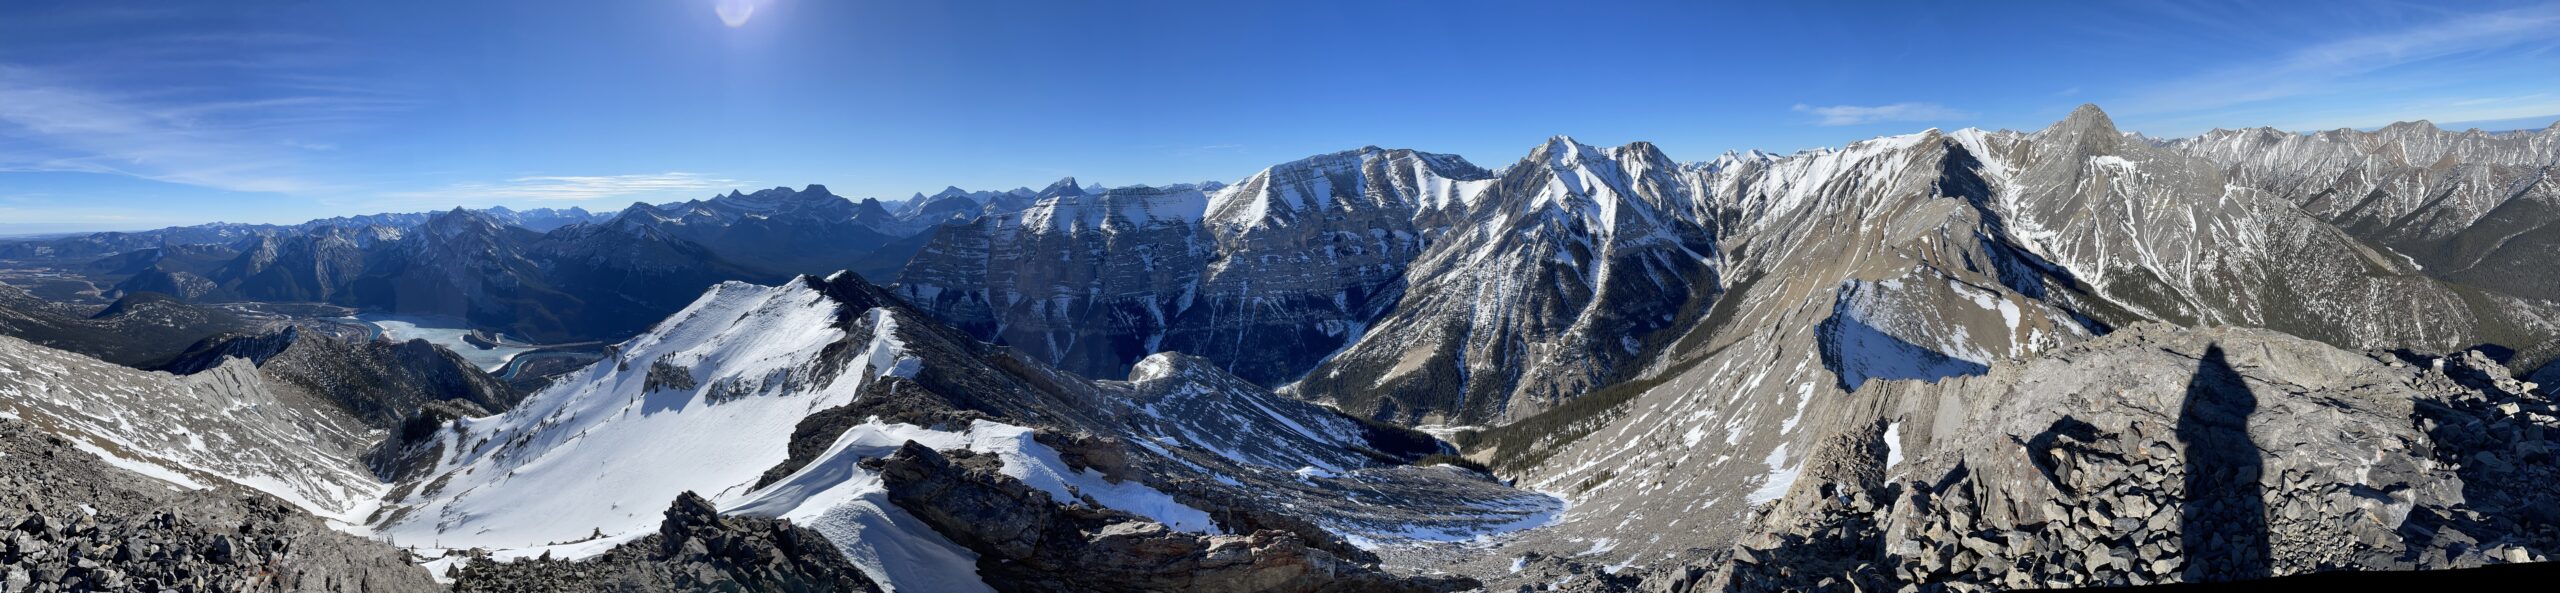
4. The Ridge
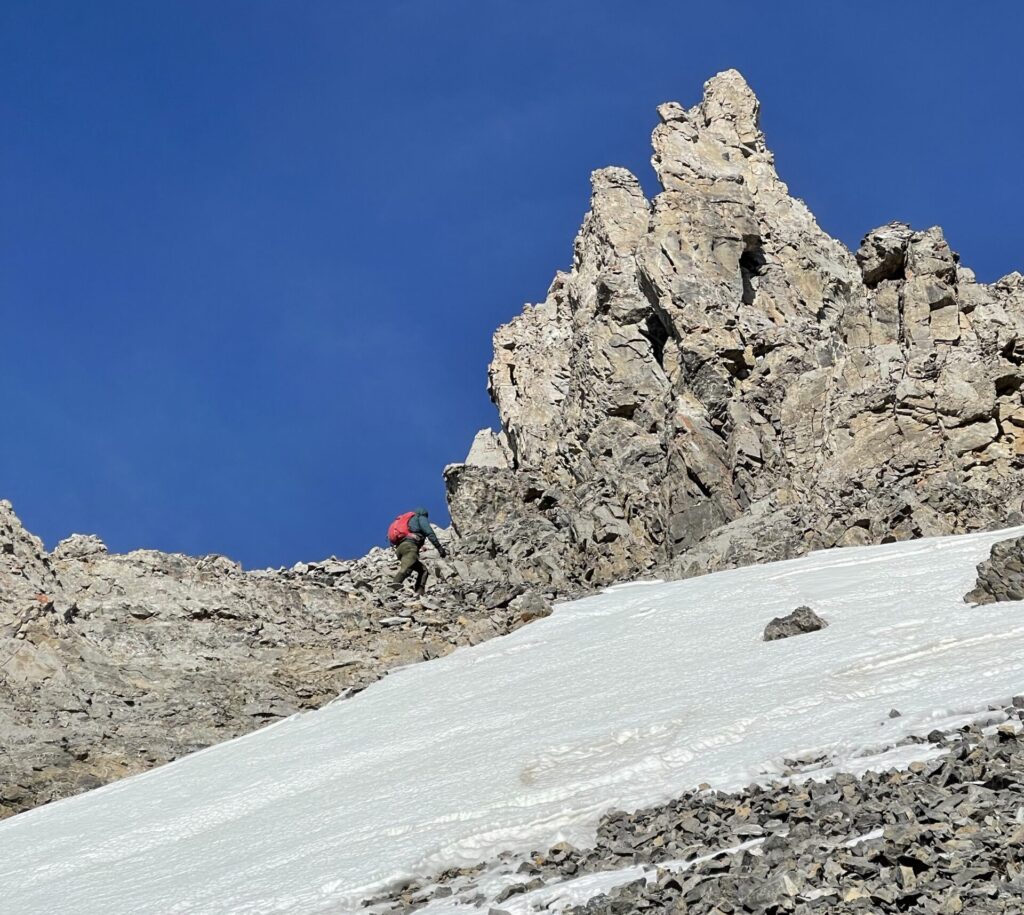
Once you get to the top of the scree, you will be on top of a false summit. The true summit should be visible as a high point along the ridge that you are on.
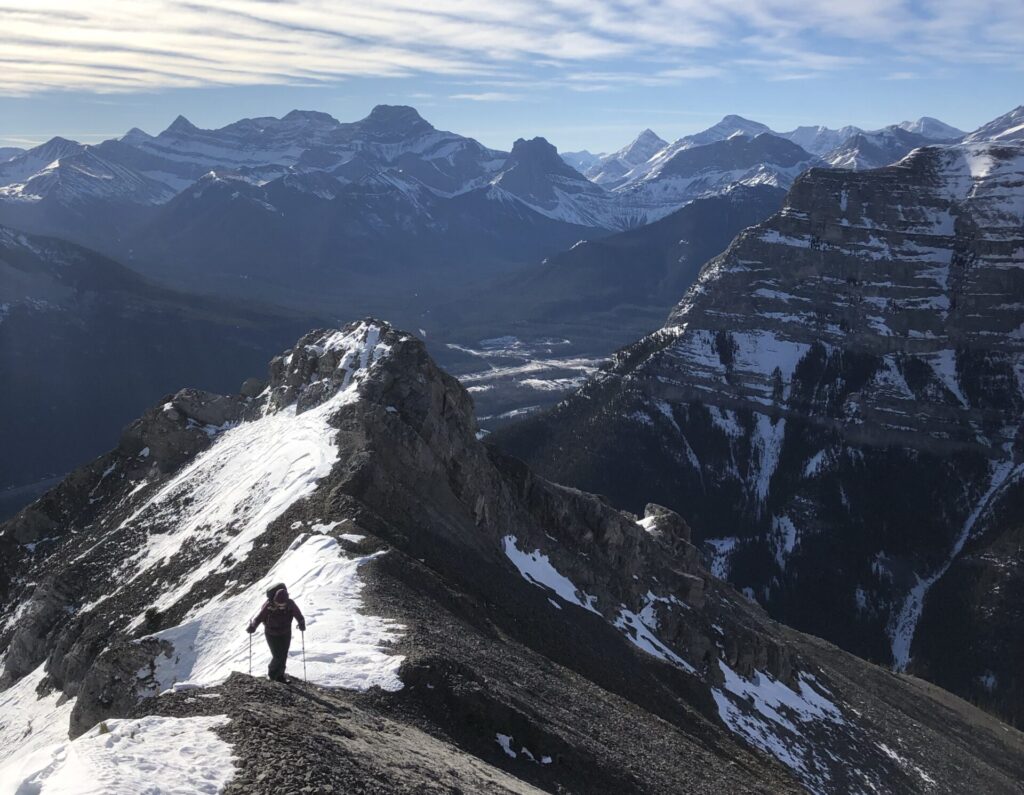
Scramble over the right (south) side of the false summit, then along the east face. The scrambling here should be fairly easy, but might require a hand consistently. Extra caution should be used if snow remains on the east side of the false summit. Getting over the false summit will likely take about 5-10 minutes.
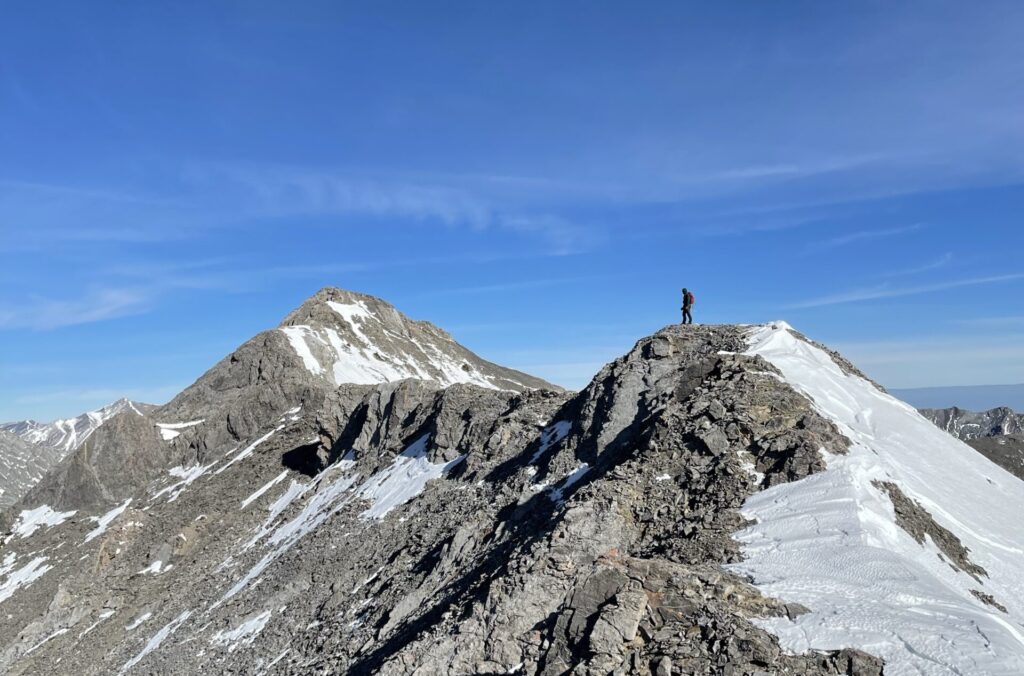
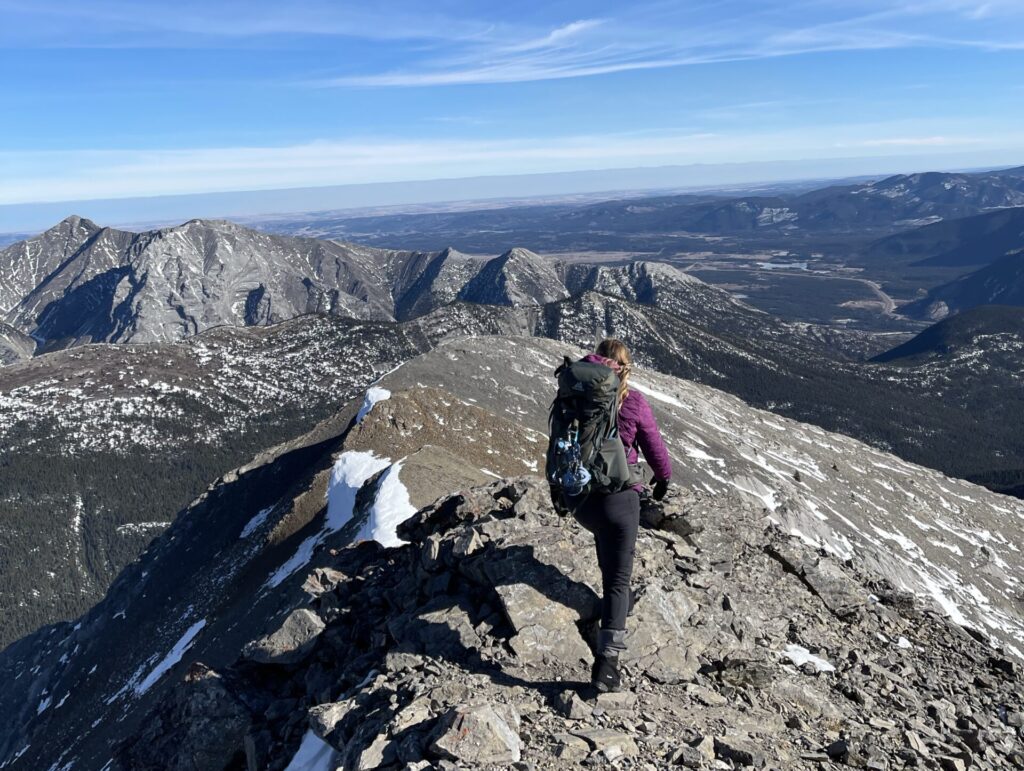
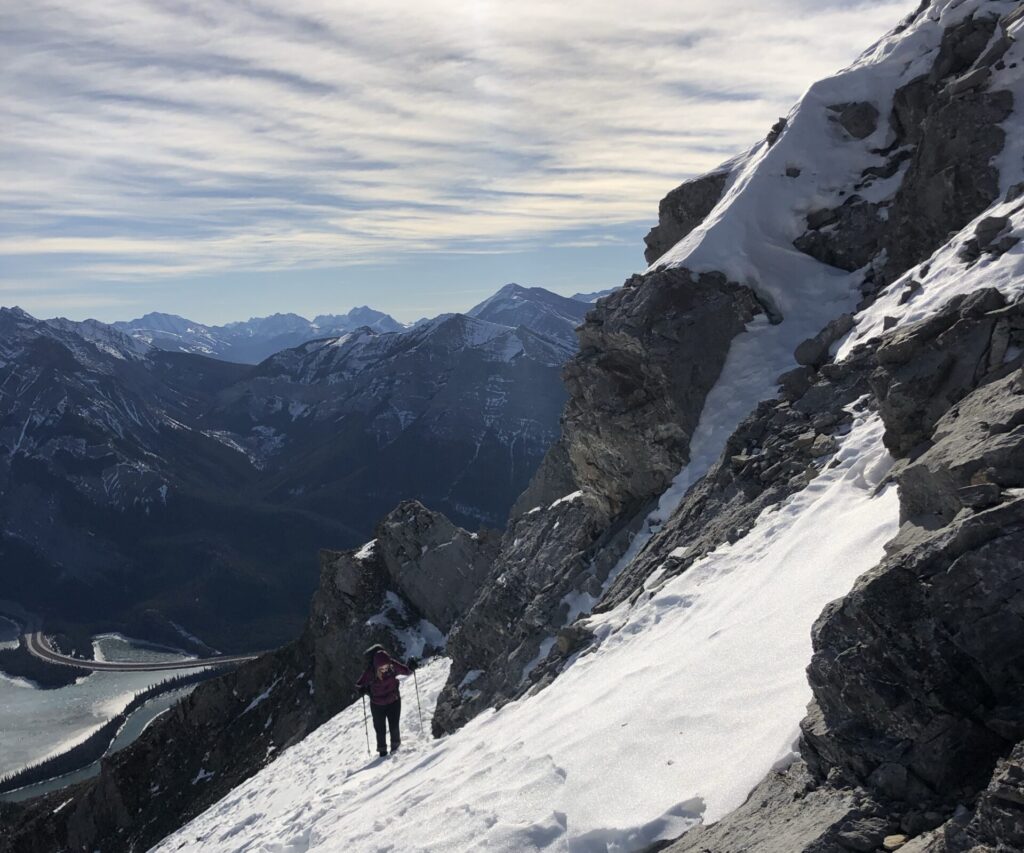
Once you have skirted around the false summit, you will be back on the ridge. The ridge is quite narrow in sections, and will require scrambling.
Follow the ridge along to the summit, scrambling when necessary. If any scramble line along the sharp exposed ridge (exposed means there is a fall risk) looks too intense, there is likely a hiker’s bypass down to the left, though you might have to lose some elevation to obtain the trail.
The hiker’s trail below the ridge and the ridge itself will eventually meet up, just before the summit. Caution should be used in either scenario, as fall hazard exists.
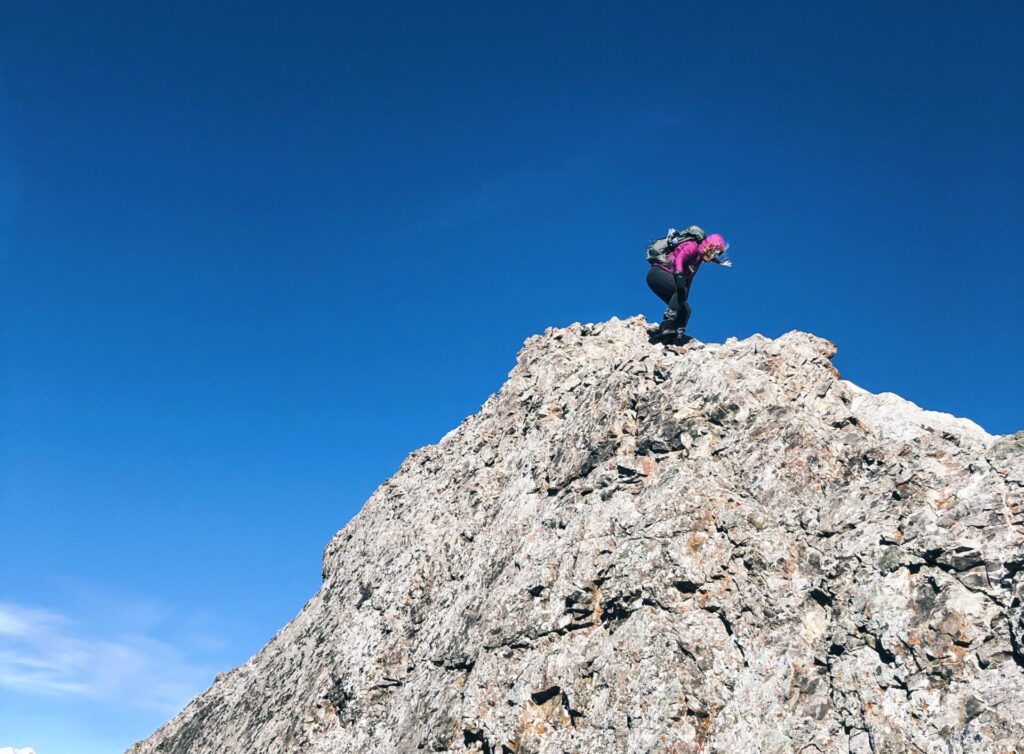
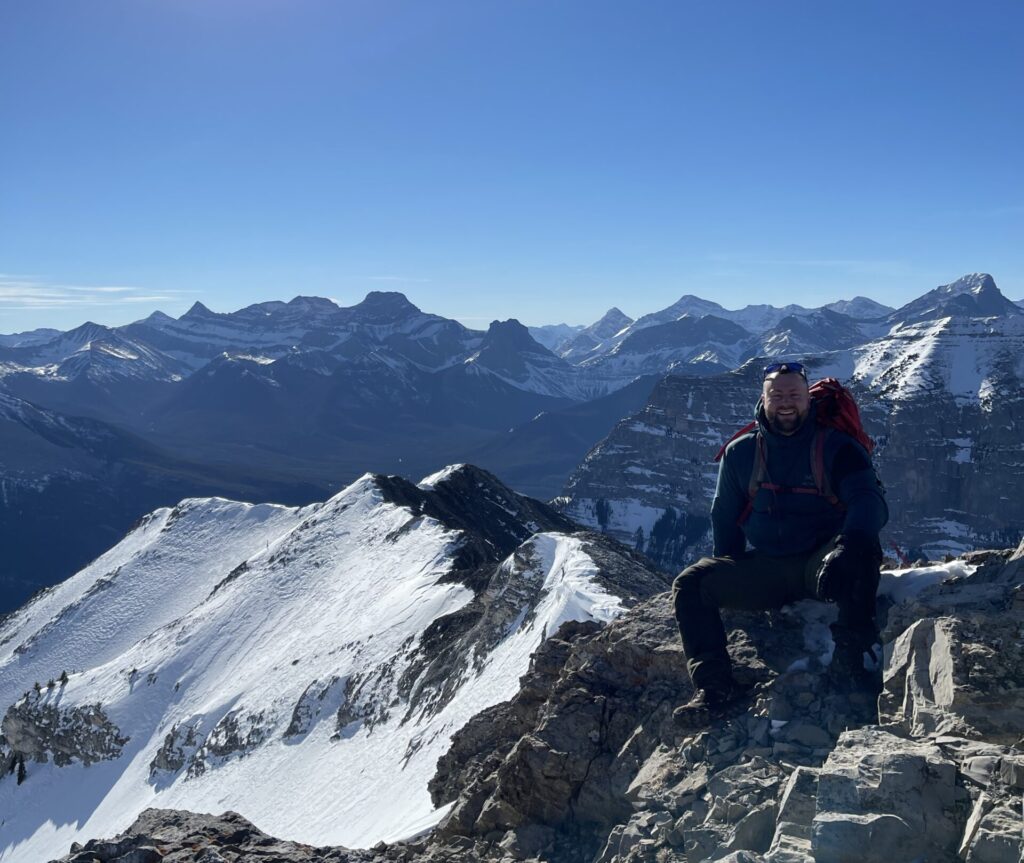
5. The Summit
The summit is the visible high point on the ridge, and is a small platform where you can rest, admire the views, and have a bite to eat. It is often marked by a small pile of rocks, known as a summit cairn, as well as a pink summit register where you can write your name in a notepad as a summit accomplishment.
The wind on the summit is sometimes more intense than the hike up, so be sure to bundle up immediately upon arrival at the summit! Enjoy the moment before descending back the way you came.
What to Bring When Hiking Gap Peak
Aside from the usual hiking supplies (friendly reminder that you should always carry bear spray in Kananskis-country), there isn’t any special equipment you necessarily need to summit Gap Peak. However, there are a few supplies I would consider bringing:
- Poles – I routinely hike with poles, but I know that’s not everyone’s preference. Because Gap Peak is a long day in steep terrain, I would consider hiking with poles to save your muscles and joints added stress.
- Helmet – Hiking underneath cliff bands poses a rockfall hazard, as does hiking in the scree bowl below another person or party. Scrambling with a helmet is also advisable for added protection. Use your own discretion if you think a helmet is warranted or not.
- Scrambling Gloves – You will need to use your hands to scramble over rock to get to the summit of Gap Peak. If you find that your hands hurt easily, especially with rough textures, or you’re planning to summit in shoulder seasons with cold rock, pack a pair of gloves to scramble in for protection.
Gap Peak Tips To Get The Best Experience
- Start Early. I would aim to be at the parking lot 30 minutes before sunrise. This gives you the best chance at nabbing a parking spot, and maximizes daylight for you to enjoy your adventure.
- Continue to Mount Fable. From the summit of Gap Peak, you are able to continue along the ridge to another summit, known as Mount Fable. The scrambling along the ridge is exposed and moderate at times, so only attempt this if you’re confident and experienced!
- Come from Anklebiter Ridge. Instead of hiking up the normal route, you can also hike up to the summit of Anklebiter, then scramble up to Gap. Again, this ridge is exposed and has a few difficult scrambling sections. Experience and competence is recommended.
- Bring a GPS map. In a Facebook group, several comments I read about this hike were issues with route-finding. Although I personally found the trail to be very straightforward, safety should be a priority, and if it’s ever a concern, a plan should be in place to navigate your way down and out.
Frequently Asked Questions
Is Gap Peak a hard hike?
Yes, Gap Peak is a hard hike. The route is long, steep, and involves some exposed scrambling. With experience and preparation, is is a doable objective.
Is Gap Peak a popular hike?
Gap Peak is not an overly popular hike. It is a common trail runners objective year-round and is lightly trafficked by hikers in the summer. A trail is beaten in and visible for most of the way. You likely won’t encounter many other parties on the mountain.
Do I need a Kananaskis pass for the Gap Peak hike?
Yes, you do need a digital Kananaskis pass for the Gap Peak hike if you plan on parking a car. To purchase a park pass, check out Alberta Park’s website, or click here.
Recommendations From My Experience
- This hike took us longer than expected. Plan for a full day, especially if you’re hiking in shoulder seasons (spring, fall)
- I would recommend hiking Gap Peak in early summer. There might still be snow around the east side of the mountain, but all the scree and scrambling will likely be snow-free. This will make for a faster ascent, lots of daylight, and fewer people.
- I LOVED the scrambling on the ridge. Stick to the ridge if you’re looking for some fun hands-on moves. Drop down to your left (ascender’s left) on the way to the summit for some easier moves and hiking bypasses.
- Although kids and dogs have summited Gap Peak, I wouldn’t recommend it for most youngsters and pets, as the hike is long and has significant exposure (fall risk).
- We hiked Gap Peak in a warm stretch of the winter, and it was doable as the ground was mostly dry. However, it was muddy in sections and snowy on the east side of the mountain, which was slippery. Microspikes and gaiters can be an asset depending on the time of year and conditions.
Other Questions?
Were your questions left unanswered? Drop a comment below and I’ll get back to you! Also, if you’ve hiked Gap Peak, leave a review below for others to see!
For other scrambling recommendations, check out Big Sister for a more challenging day, or Door Jamb and Loder for an easier objective!
Happy trails!